
Halloween is a time of year when kids’ imaginations run wild, and what better way to celebrate than with some spooky, fun, and delicious snacks?
If it is your turn to throw a Halloween party, doing treats for a classroom edibles party, or even just getting festive at the house, making edible snacks for children is a lot of fun.
From scary bugs to highly edible scary food all is possible and the list is endless. And the cherry on the top?
So many Halloween snacks are simple enough that kids can help prepare in the kitchen, keeping them busy and involved.
Whichever you are in the mood for, be it healthy, or sweet, or somewhere in the middle, there’s a Halloween snack that’s sure to please every little ghoul and goblin. So, let’s get get cooking!
The 9 Best Halloween snacks for kids and recipes
1. Monster Rice Krispie Treats
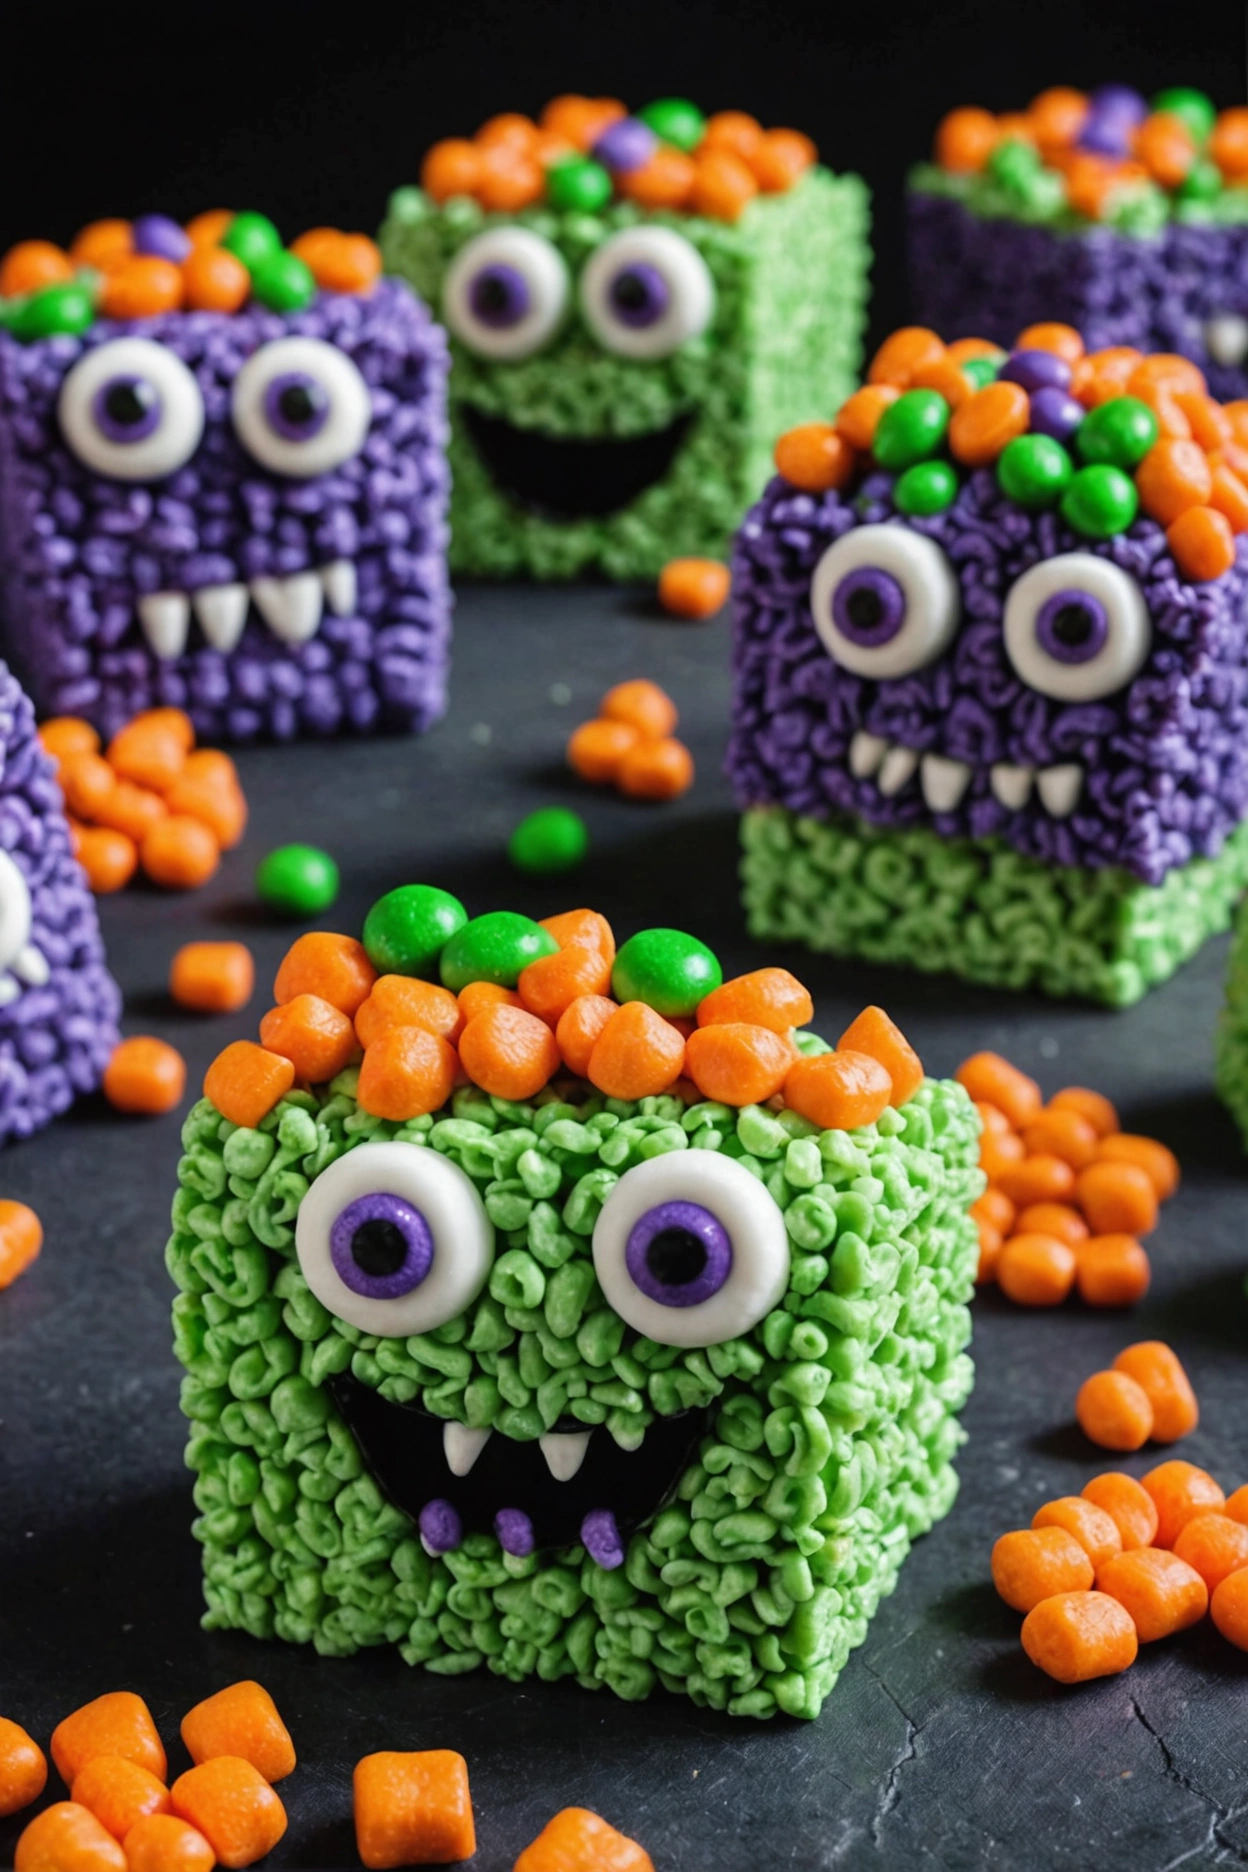
These are awesome to make as a ghoulish treat, I love using gooey marshmallows, crispy rice cereal and rich, buttery flavors in my recipe. I like to add food coloring for added fun, ghoulish coloring and candy eyes for extra creepiness.
Ingredients
- 3 tablespoons unsalted butter
- 1 package (10 oz) mini marshmallows
- 6 cups Rice Krispies cereal
- Food coloring (green, purple, orange, or any desired colors)
- Candy eyeballs
- Assorted candies (e.g., M&Ms, sprinkles, candy corn)
Instructions
1. Melt the butter in a large saucepan over very low heat; then add the mini marshmallows, and stir until completely melted and smooth.
2. Pour the marshmallow mixture into separate jars based on the amount of colors you want, then add the food colorings and mix well until you get the color you want.
3. Dump 2 cups of Rice Krispies cereal into each bowl, mixing until the cereal is completely coated with the colored marshmallow glue.
4. Compress the colored mixtures into a greased 9×13 inch pan, layering or swirling the colors as desired. Use a greased spatula or wax paper to compress the mixture flat and smooth.
5. While slightly warm, decorate the top with candy eyeballs and assorted candies, pressing them gently into surface so that they stick.
6. Let cool completely before cutting into squares or monster shapes.
2. Mummy Hot Dogs

My secret ingredient in my spooky snacks would definitely have to be refrigerated crescent roll dough. I think using this dough adds a great flaky wrap to my mummy treats and hot dogs make a great meaty center.
I think my treats came to life when I added the candy eyes, and they have a great little “bandage” detail when you add a little mustard or ketchup.

Ingredients
4 hot dogs
1 can of crescent roll dough
Mustard or ketchup (for decorating as eyes)
Instructions
1. Preheat your oven to 375°F (190°C).
2. Cut the strips into thin strips, about 1/4-inch thick.
3. Wrap each hot dog with the dough strips, leaving a small gap below one end to create a ‘face’.
4. Place the wrapped hot dogs on a baking sheet lined with parchment paper.
5.Bake for 12-15 minutes in the preheated oven or until the dough is golden brown.
6. Use mustard or ketchup to add eyes to the mummies, then serve warm.
3. Witch Hat Cookies
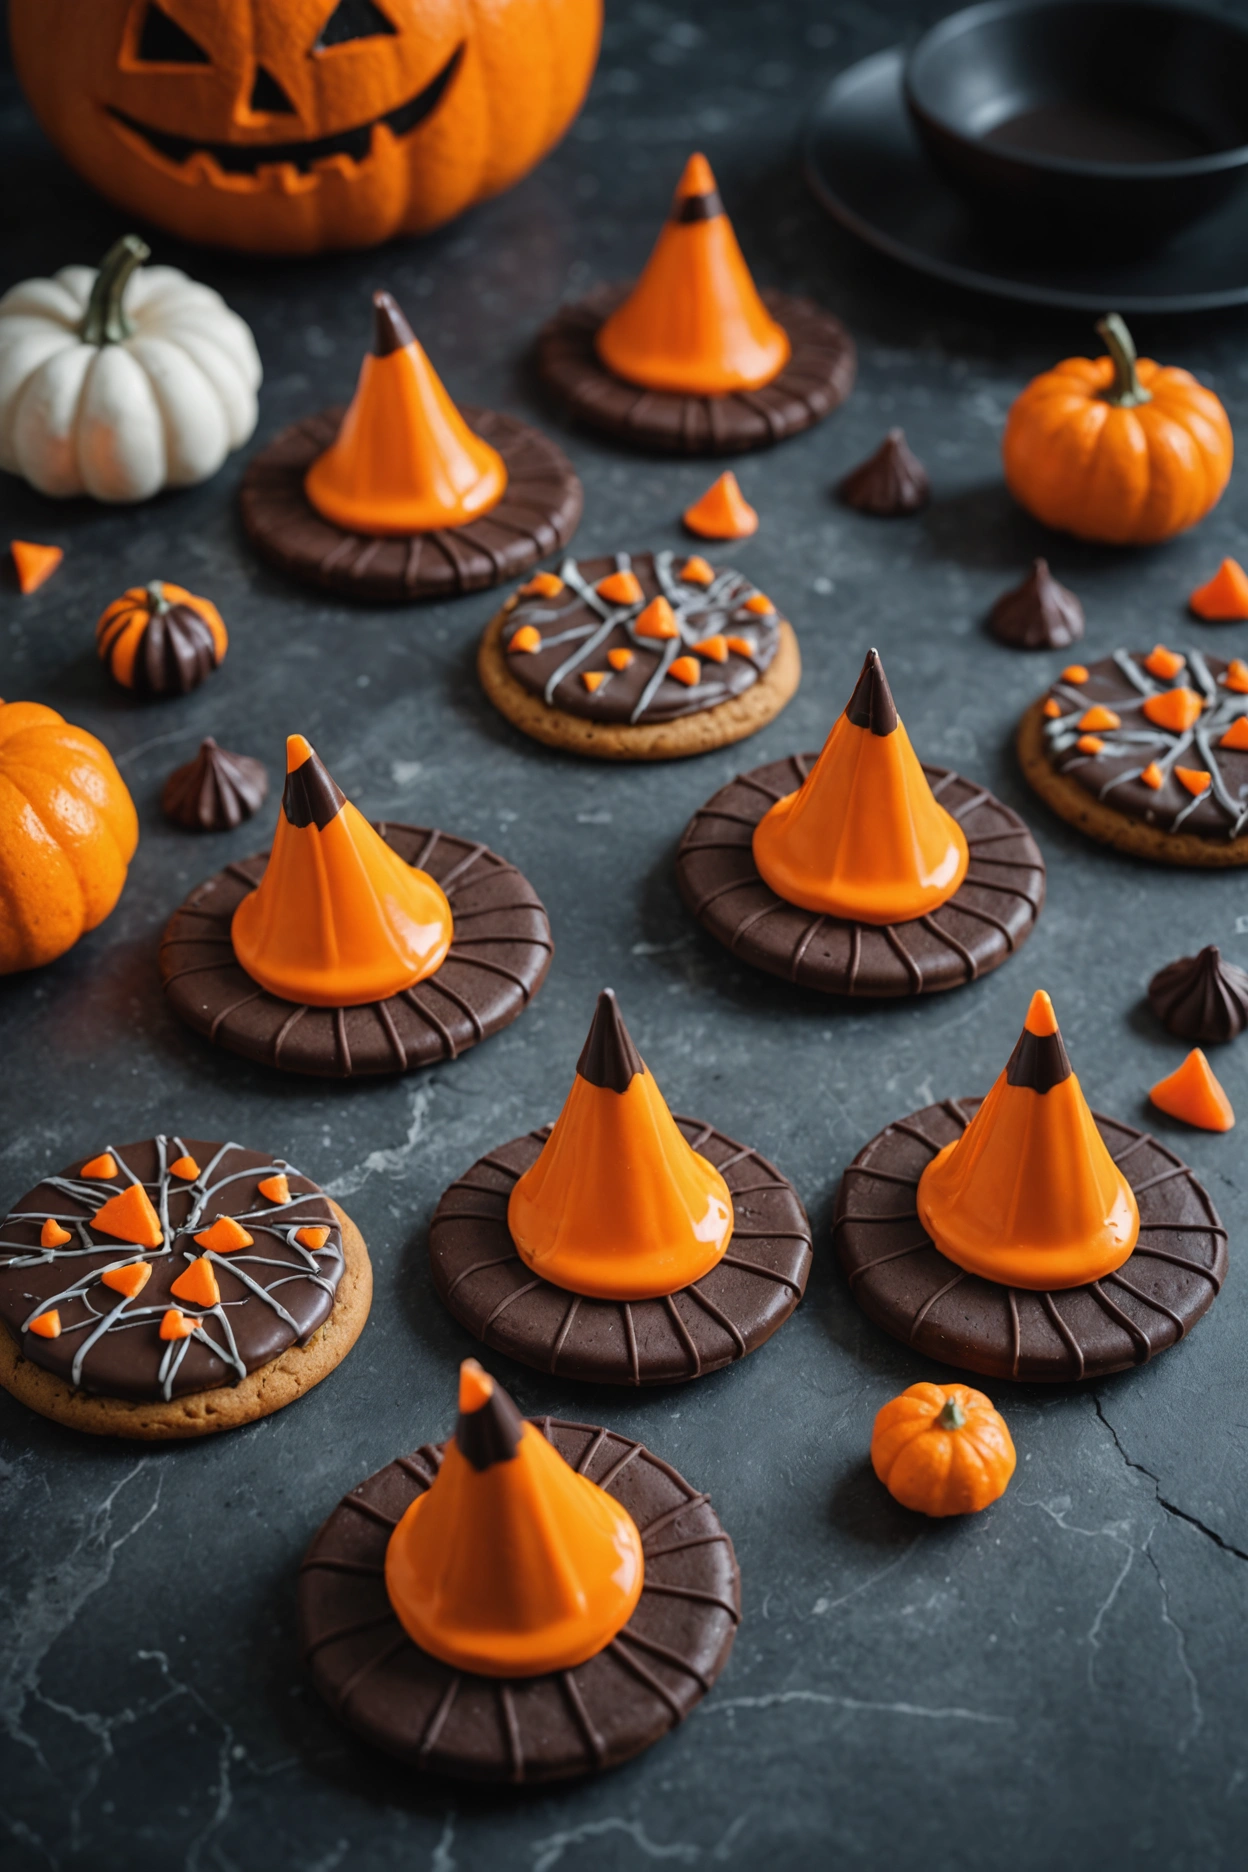
Sure, I have some fun, spooky themed cookies in my bag of baking tricks for Halloween that evoke visions of witches, cobwebs, and black-and-orange jack-o-lanterns, but without a doubt, my favorite festive holiday cookie is my witch hat cookies with festive decorations (topped with a Hershey Kiss in a color to match the icing and some colorful decorative icing or candy.)
I love how easy it is to decorate these cookies for a party using just a few ingredients (you know, for the kids who like to help out) and tell me that they don’t look fantastic!
What a fun and festive treat!
Ingredients
- 1 package of fudge-striped cookies
- 1 bag of Hershey’s Kisses
- 1 tube of orange decorating icing
Instructions
1. Unwrap the Hershey’s Kisses.
2. Dot the surface of one Hershey’s Kiss with a little orange decorating icing.
3. Use the icing to attach the Kiss to the fudge-striped half of the cookie.
3. Place the Hershey’s Kiss in the centre of the fudge-striped side of the cookie, using the icing to stick it on.
3. Using the frosting, affix the Hershey’s Kiss to the fudge-striped half of the cookie.
4. Use the orange icing to pipe a ring around the base where the Kiss and the cookie meet, to form the hat band.
5. Allow the icing to set and dry before serving.
4. Jack-o’-Lantern Orange Fruit Cups
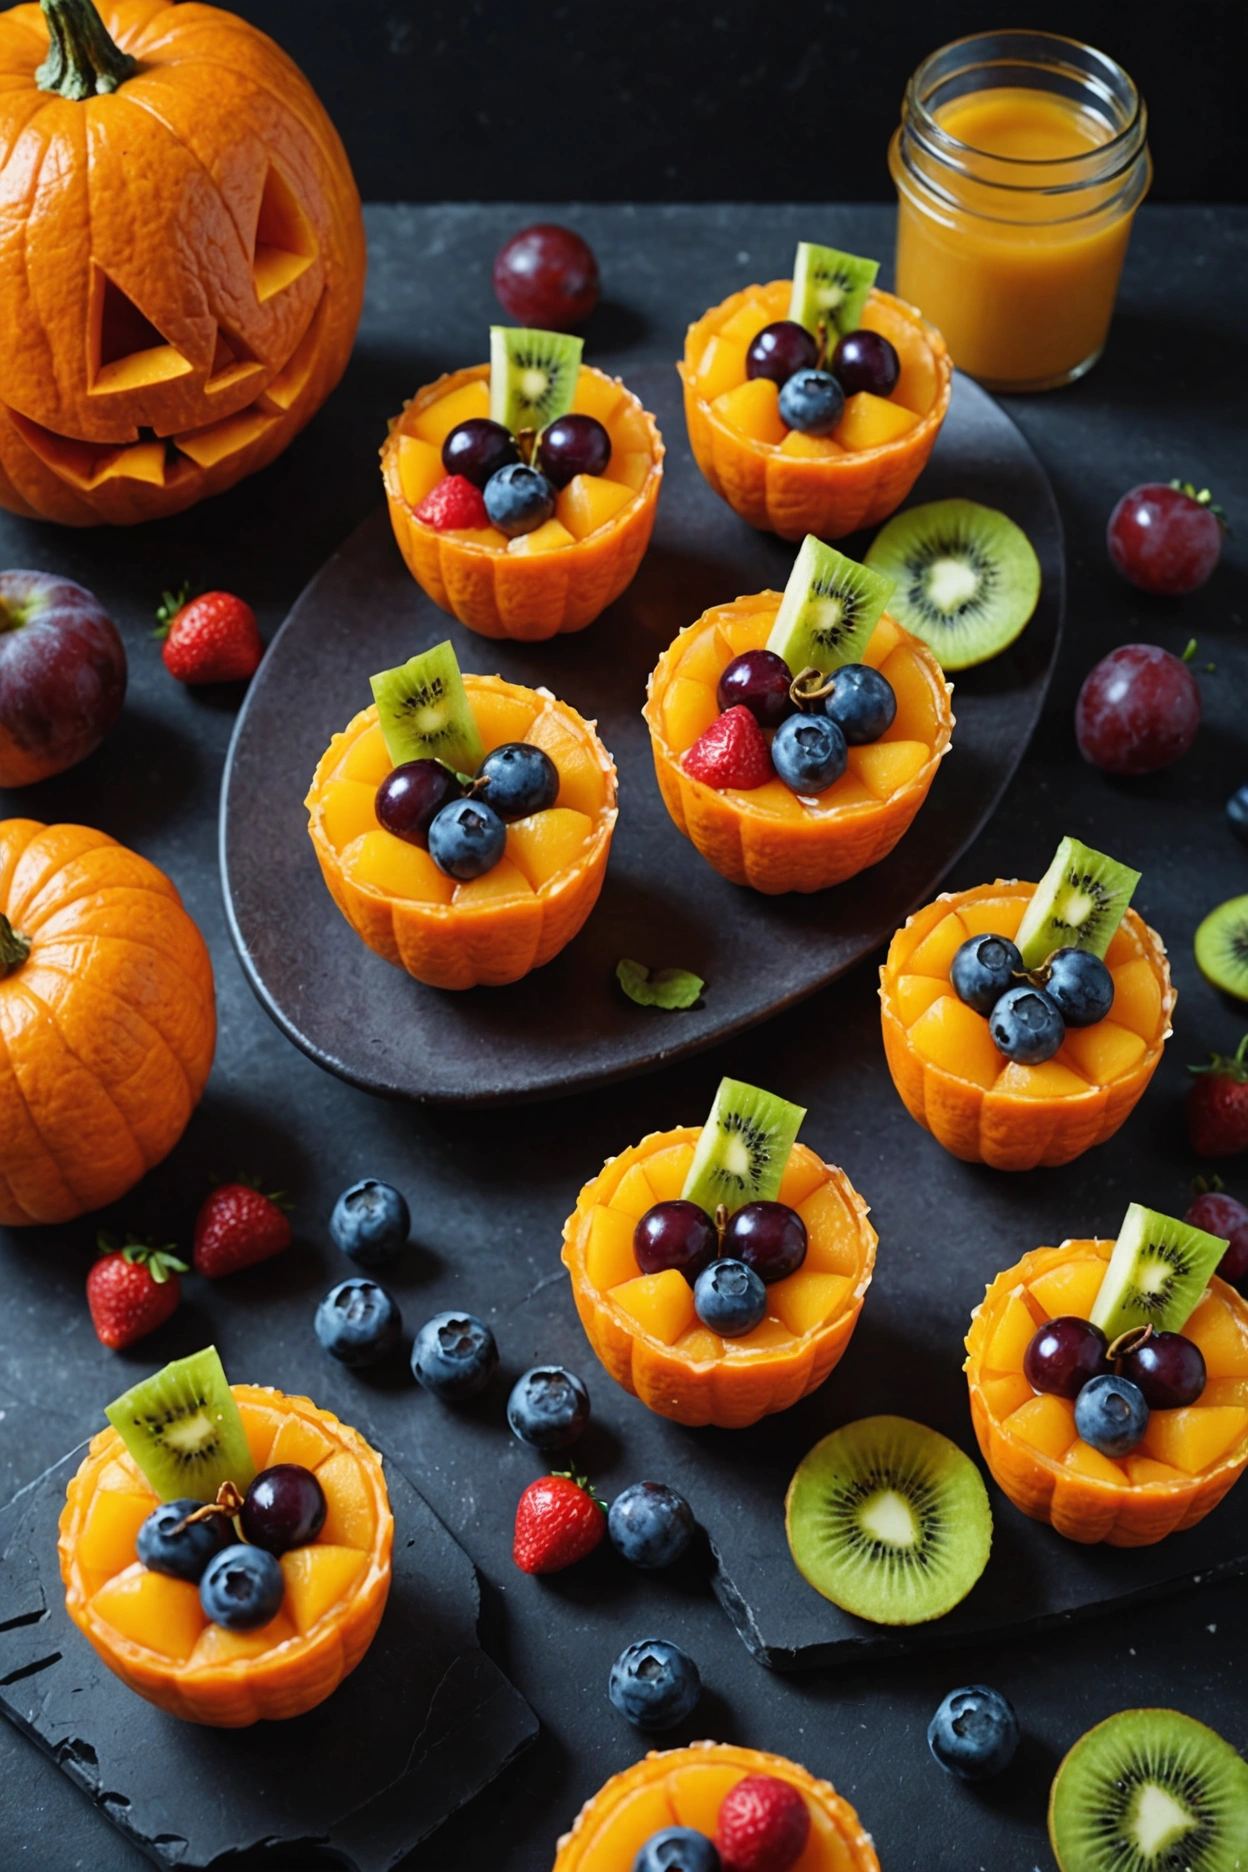
For me creative and healthy Halloween treats are number one! I love decorating oranges in a beautiful crazy way turning them into a fun Holiday giving.
My favorite recipe includes slices of juicy mandarins, pineapple chunks and pomegranate seeds all together also blueberries or strawberries to make fruit’s bowls in a beautiful color palette. Every kid and adult smile when they see brilliantly colorful fruit cups.
Ingredients
4 medium-sized navel oranges
1 cup mixed fresh fruit (such as grapes, blueberries, strawberries, kiwi)
1 tablespoon lemon juice (optional, to prevent browning of fruits)
1 tablespoon honey (optional, for added sweetness)
Instructions
1. Hollow the Oranges
Trim the tops off the oranges about 1/4 of the way down, then dig out the pulpy flesh and pith using a spoon, trying to keep the fruit intact and reserving the segments and juice for another use.
2. Cut Jack-o’-Lantern Faces: Use a small paring knife to cut jack-o’-lantern faces into the orange peels being careful not to tear them.
3. Make the Fruit Filling: Chop up the fresh fruit into small bite-sized chunks. Toss the fruit with the lemon juice and raw honey if using it, to add flavor and prevent browning.
4. Load the Orange Cups
Fill each hollowed-out orange jack-o’-lantern cup with a heap of the mixed fruit.
5. Replace Your Tops And Serve
Put the citrus cups onto a platter and serve right away or store in the fridge before serving.
5. Ghost Popcorn Balls
Nothing is more delightful than making little spooky sweet treats.
When thinking about making these creepy little goodies, there are a couple things that come straight to my mind. Such as, using mini marshmallows and butter as a base, and white or dark chocolate chips for that spooky ghostly covering.
Ingredients
10 cups popped popcorn
1 cup granulated sugar
1/3 cup light corn syrup
1/2 cup unsalted butter
1/4 teaspoon salt
1/2 teaspoon vanilla extract
White candy melts or white chocolate chips (for coating)
Mini chocolate chips (for the eyes and mouth)
Optional: black decorating gel or edible ink marker (for additional detailing)# Instructions
1. Get the popcorn ready
Spread the popped popcorn out on a very large baking sheet, on a layer of parchment paper, and pick out any unpopped kernels.
2. Make the Syrup
In a medium saucepan over medium heat, combine the sugar, corn syrup, butter and salt. Stir constantly until mixture boils. Boil without stirring until the syrup reaches the soft-ball stage (235-240°F or 113-115°C) on a candy thermometer, about 2-3 minutes.
3. Popcorn and Syrup
Combine: remove the saucepan from the heat and add the vanilla extract. Pour the syrup over the popcorn and use hands or a spoon to mix up and coat. Allow to cool for a couple of minutes until it’s cool to the touch but malleable.
4. Roll into Balls
Rub a little butter or cooking spray over your hands. Roll the popcorn mixture into balls, about the size of a small fist, and squeeze together until they hold shape. Place them on the lined baking sheet to set.
5. Ghost-ify: Melt the white candy melts or white chocolate chips as per package instructions. Dip each popcorn ball into the white candy or chocolate and shake to coat the whole thing. Tap off excess and place back on the lined baking sheet to set.
6. Attach Faces
After the coating has set but is still quite tacky, press mini chocolate chips into the coated popcorn balls to make the eyes and mouth of each ghost. You can also make detailed faces using black decorating gel or an edible ink marker, if you like. Let ghosts set completely before eating.
6. Spider Crackers
Some of my favorite Halloween snacks combines a few basic ingredients and comes together really quickly. Cream cheese makes a great base and black olives are such a perfect addition here… the black olive bodies, ha!
Hollowed-out whole grain crackers provide great crunch, I use thin pretzel sticks for spider legs.
Ingredients
- 16 round crackers
- 1/2 cup creamy peanut butter or any nut-free butter
- 32 small pretzel sticks
- 16 candy eyes
- 1 tablespoon honey or corn syrup
Instructions
1. Spread peanut butter on one side of 8 crackers.
2. Arrange 4 pretzel sticks snugly on either side of the cracker to become the legs.
3. Top with another cracker to make a sandwich.
4. Use a little waxed paper to daub the back of each candy eye with honey or corn syrup.
5. Place two candy eyes on top of each cracker sandwich.
6. Serve immediately or store in an airtight container for up to one day.
7. Frankenstein Pudding Cups
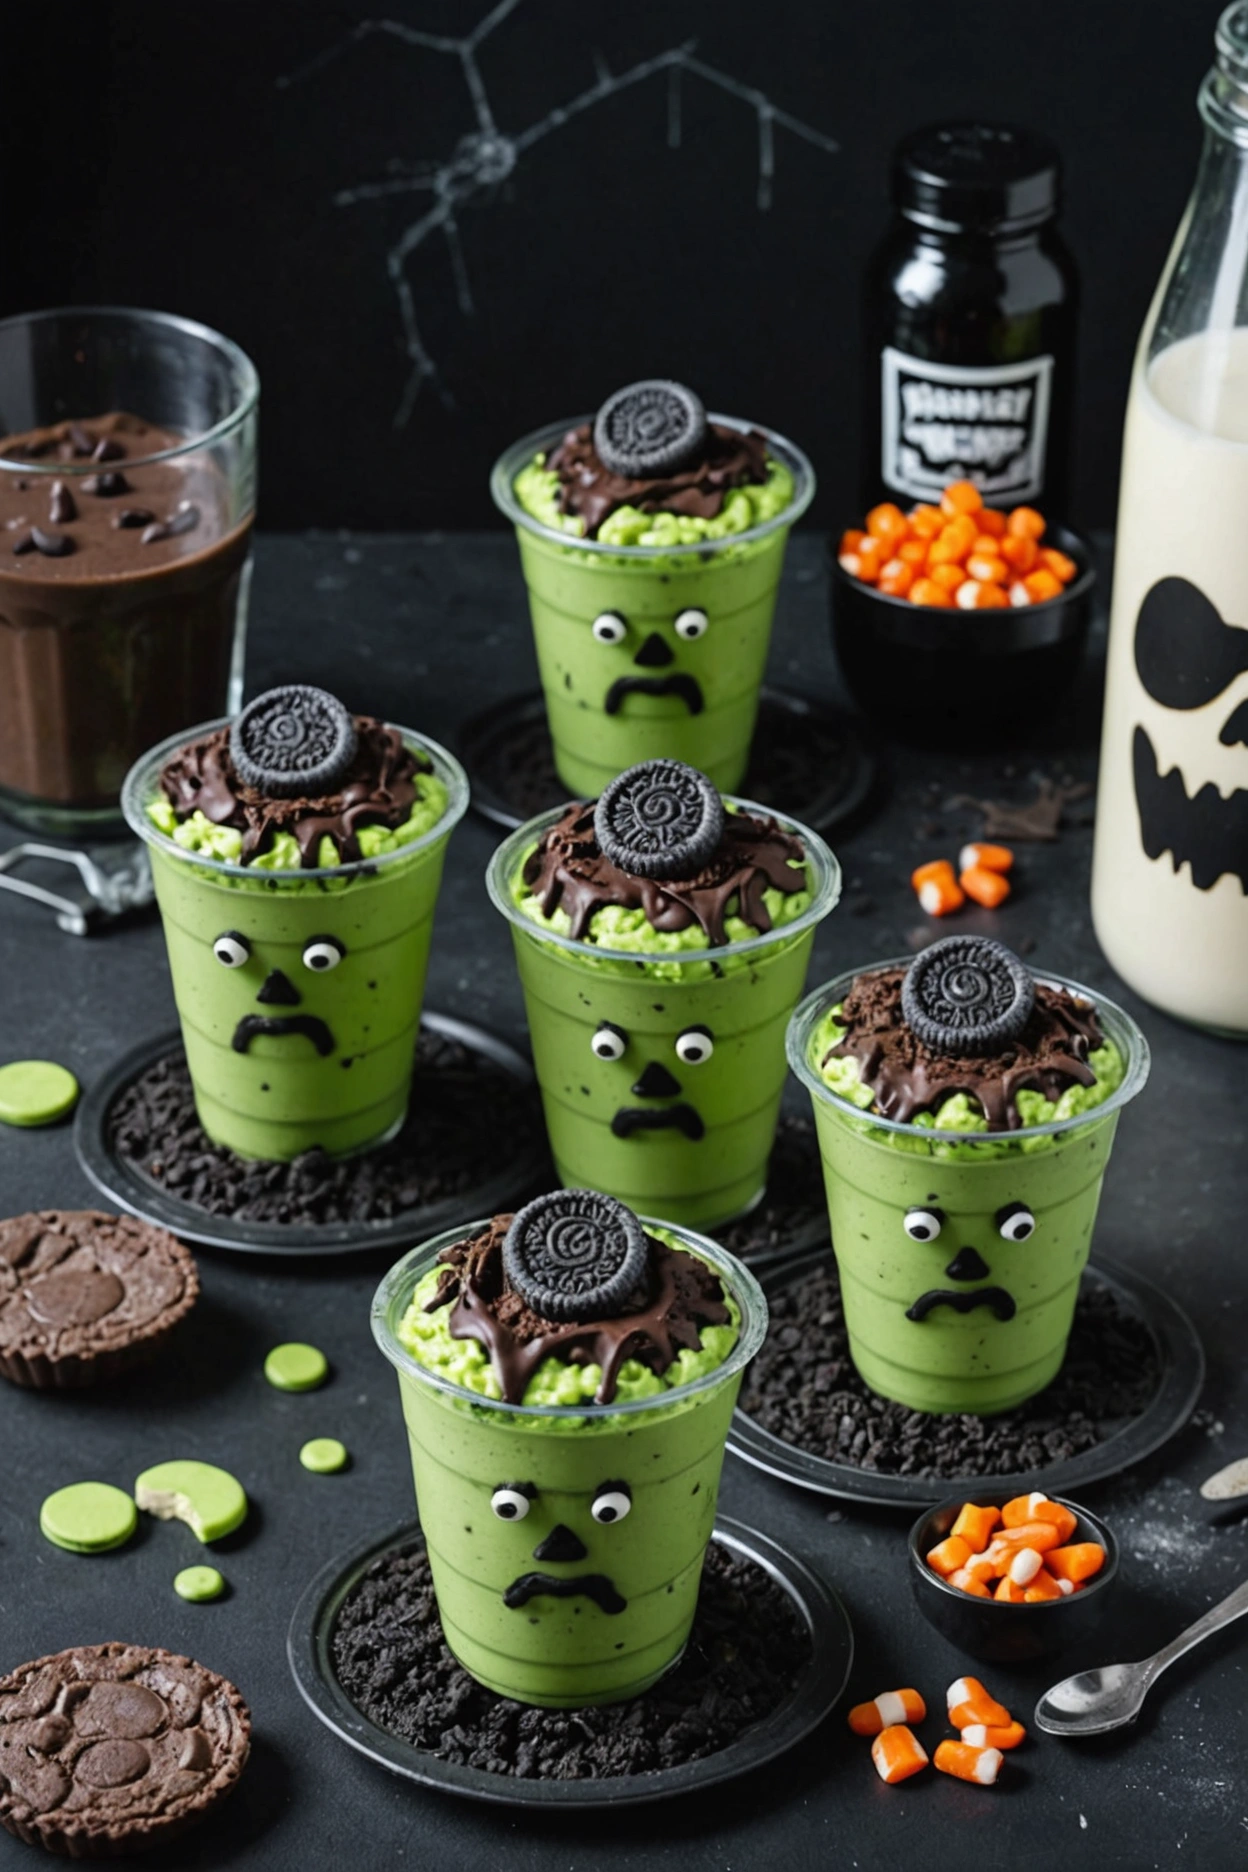
Halloween is a great occasion for coming up with creepy treats that are easy to make. My favorite is a pudding, as a base, with cookies, and a mix of green and red gummy worms.
Add the green food coloring for added eerie effect. Mine always receive praise.
I top them off with pieces of crumbled chocolate cookies for that dirt top to the container. Candy eyes just add to the playful Monster factor that the kids love.
Ingredients
- 1 package (3.4 oz) instant vanilla pudding mix
- 2 cups cold milk
- Green food coloring
- 1 cup crushed Oreo cookies (for “dirt”)
- 1/4 cup mini chocolate chips (for “hair”)
- 1 tube black decorating gel (for facial details)
- 6-8 clear plastic cups
- 6-8 large marshmallows (for “bolts”)
Instructions
2. In a large bowl, whisk together the instant vanilla pudding and milk until thick and smooth.
2. As recommended by McKenzie, add a few drops of green food coloring to the pudding mixture and stir until you reach your desired shade of green.
3. Spoon the pudding into the clear plastic cups so all cups are approximately 2/3 full.
4. Cover the pudding with a layer of finely crushed Oreo cookies to look like ‘dirt’.
5. Sprinkle ‘hair’ (mini chocolate chips) on top of the pudding, toward the back of the cup.
6. Draw Frankenstein’s face on to the front of each cup using black decorating gel, and add one marshmallow on each side of the cup for the ‘bolts’.
8. Candy Corn Jello Cups
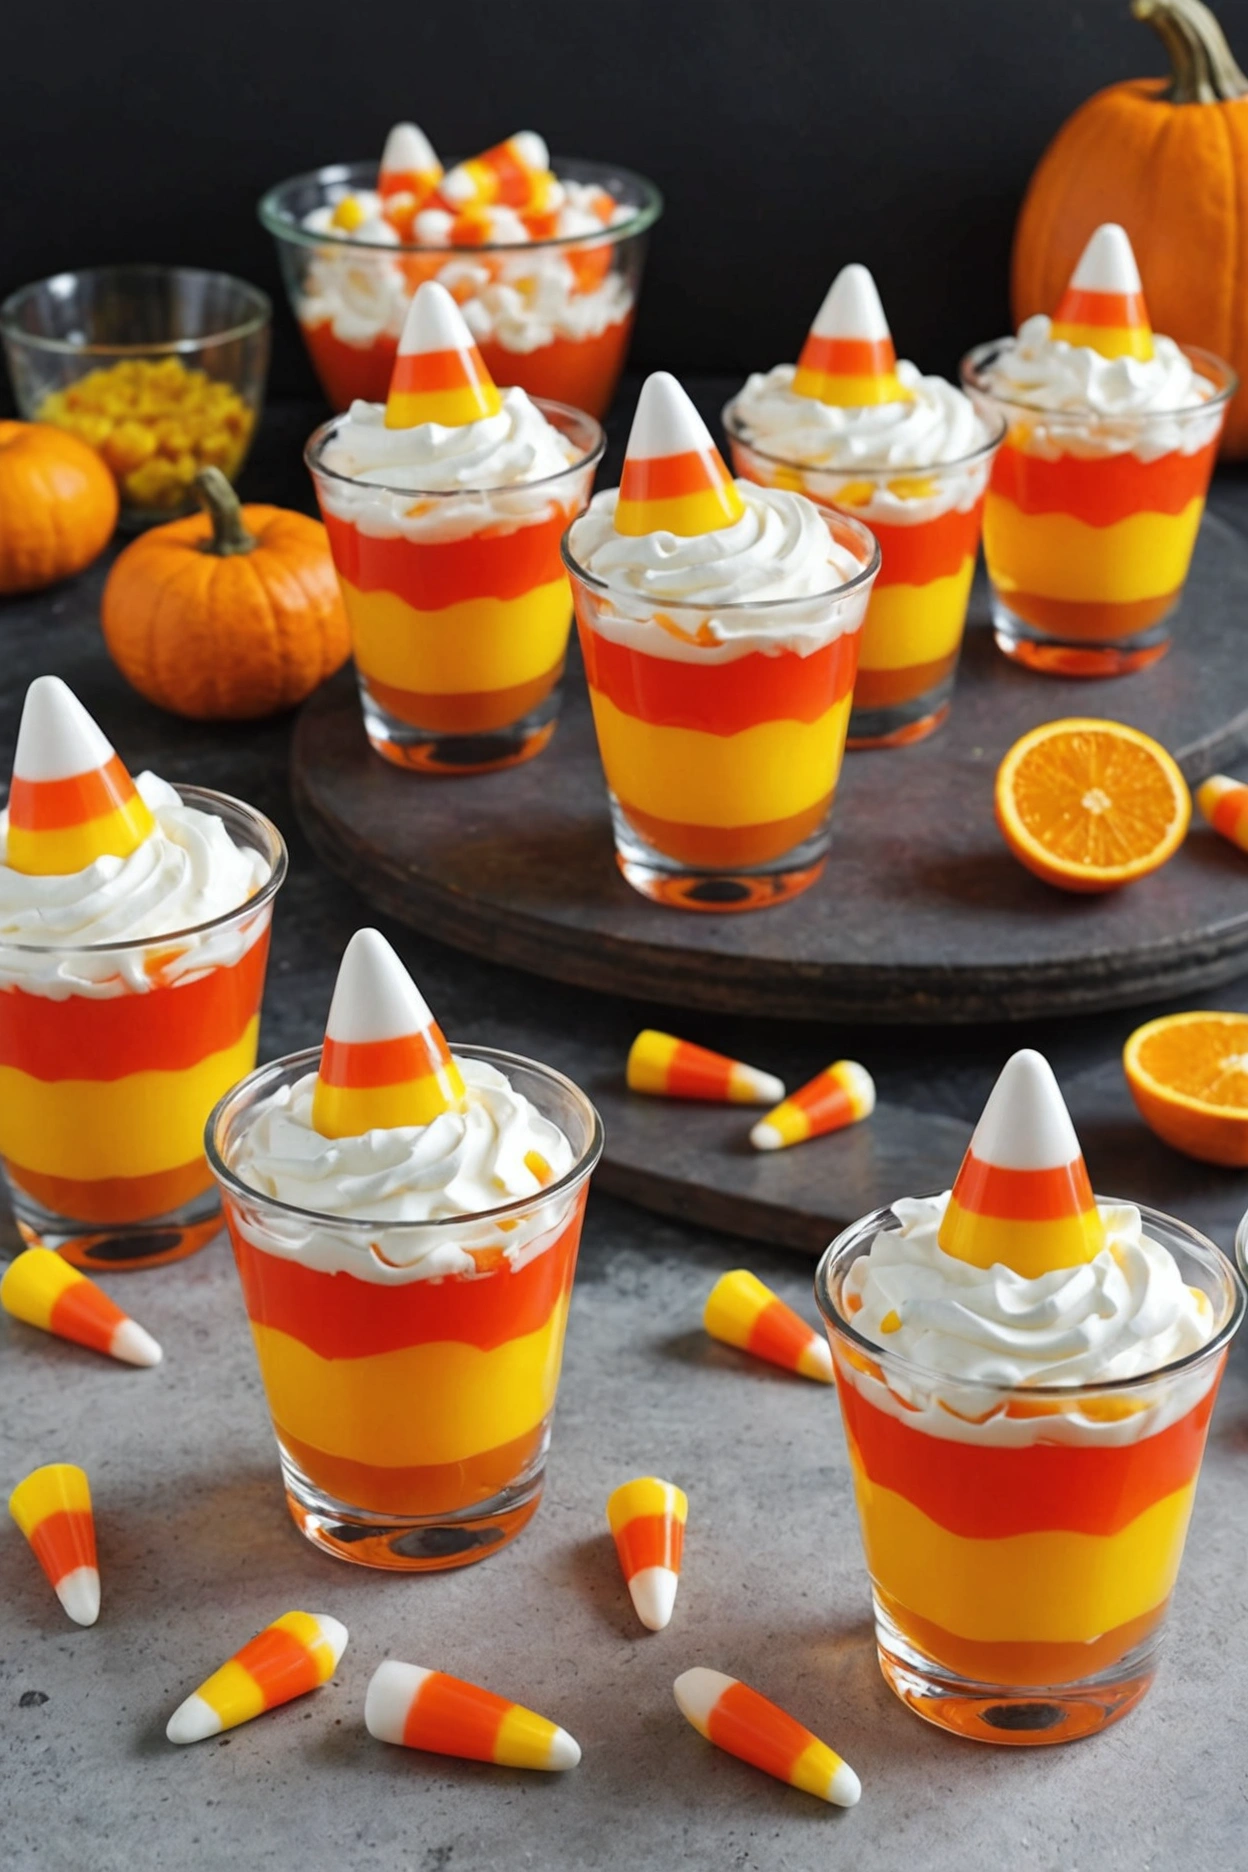
Festive treats. Making colorful layered and fun deserts to share are my favorite treats too.
I love making a colorful, layered treats such as orange jello and lemon jello. With a quick small dollop of whipped cream on top always make the kids smile.
Ingredients
- 1 box (3 oz) lemon-flavored Jello
- 1 box (3 oz) orange-flavored Jello
- 1 cup cold water
- 2 cups boiling water
- 1 cup whipped cream or whipped topping
- Candy corn for garnish
- 8 clear plastic cups or mini dessert cups
Instructions
1. BOIL 1 cup water. Stir in lemon Jello until completely dissolved. Add 1/2 cold water, stir, then fill 8 cups evenly with jello mixture. Refrigerate until firm (about 1 hour).
2. When the lemon layer is set, prepare the orange Jello the same way. Pour it slowly and carefully on the lemon layer and allow to set in the refrigerator (another 1 hour).
3. When both layers of Jello are set, top each glass with a heaping tablespoon of whipped cream or Cool Whip.
4. Garnish with candy corn pieces on top of the whipped cream.
5. Serve chilled and enjoy these festive Halloween snacks!
9. Bat Oreos
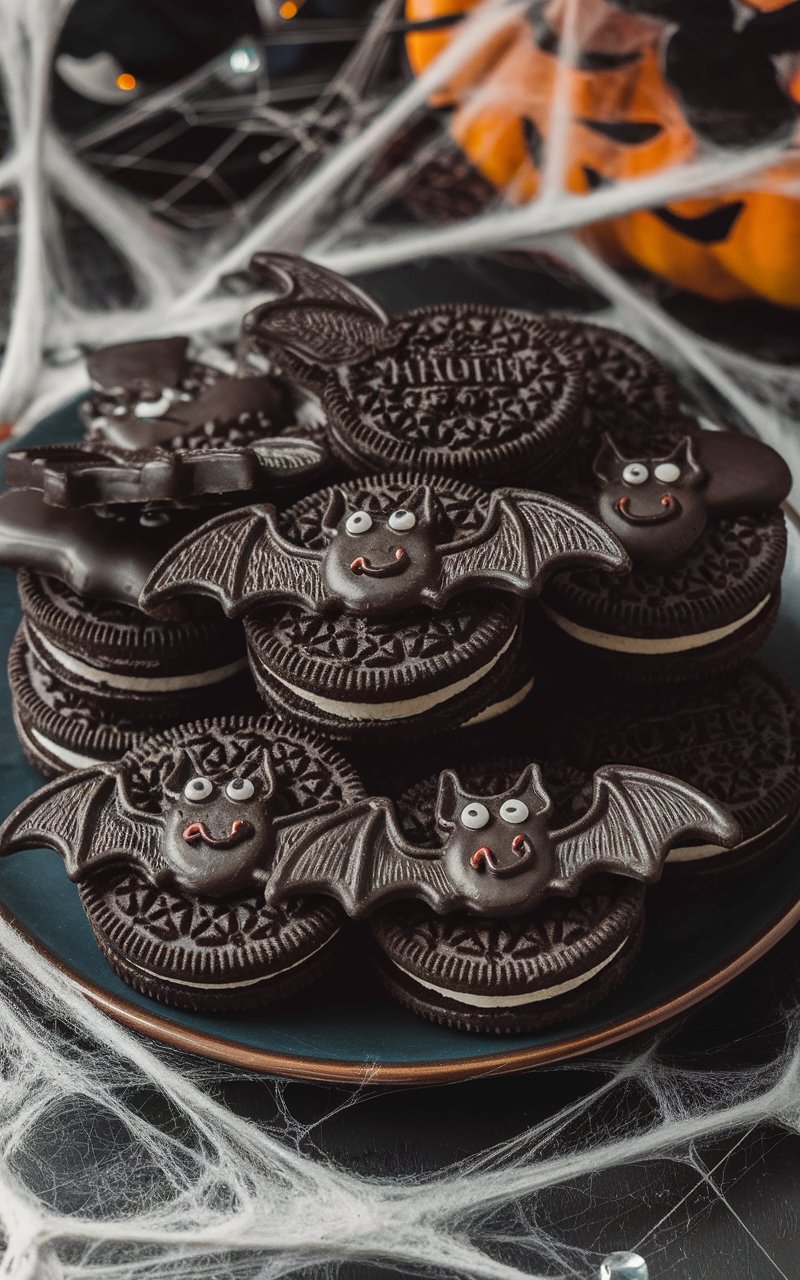
I love these fun little tasty treats with a combo of crushed chocolate wafers, white chocolate and orange food coloring. I added in some of my favorite flavors such as vanilla extract and sprinkles to make them something special.
Mine are never complete with out the cute little candy eyes. Now that’s how you make a spooktacular Halloween treat.
Ingredients
- 1 package of Oreo cookies
- 1 cup of chocolate chips (for melting)
- 12-14 mini Reese’s peanut butter cups
- 24 candy eyes (or small white and black candies for eyes)
- 1 small piping bag or zip-top bag (for the melted chocolate)
Instructions
1. Split the Oreo cookies in half and remove the filling.
2. Cut each mini Reese’s peanut butter cup in half to form bat wings.
3. Heat chocolate chips in a microwave-safe bowl for 20 seconds, then stir, repeating until the chocolate is fully melted and smooth.
4. Dip one edge of each Oreo half into the melted chocolate, then stick on the closed Reese’s cups to make the wings. Set slightly.
5. Use the melted chocolate to attach the candy eyes onto the Oreo cookie.
6. Allow the assembled Bat Oreos to set completely before serving.

