
We are just around the corner from Halloween – bring on the parties! In my opinion, the best thing you can take to a Halloween party is edible party food.
After so many Halloween parties, family get-togethers, and more, searching and creating my own recipes have given me some of the best, and funnest (yes, funnest) recipes that I’ve found out there. Halloween is a time where you can show the young and old the creative and delicious side of what you prepared.
Now, after having several Halloween parties for my kids and their friends, and having family parties as well, I thought that I’d put together a few of my favorite spooky treats, snacks, and foods to help you make a Halloween party. And, not only are those foods spooky, but they’re also great and delicious goodies to have at a party.
I’ve provided a few of my all-time favorite spooky snacks in this post, which will not only add a bit of paranormal to your party, but also great for your guests to enjoy. So, grab your witch’s broom and apron, and lets’ get started!
The 16 Best Halloween treat recipes
1. Witch’s Brew Brownies
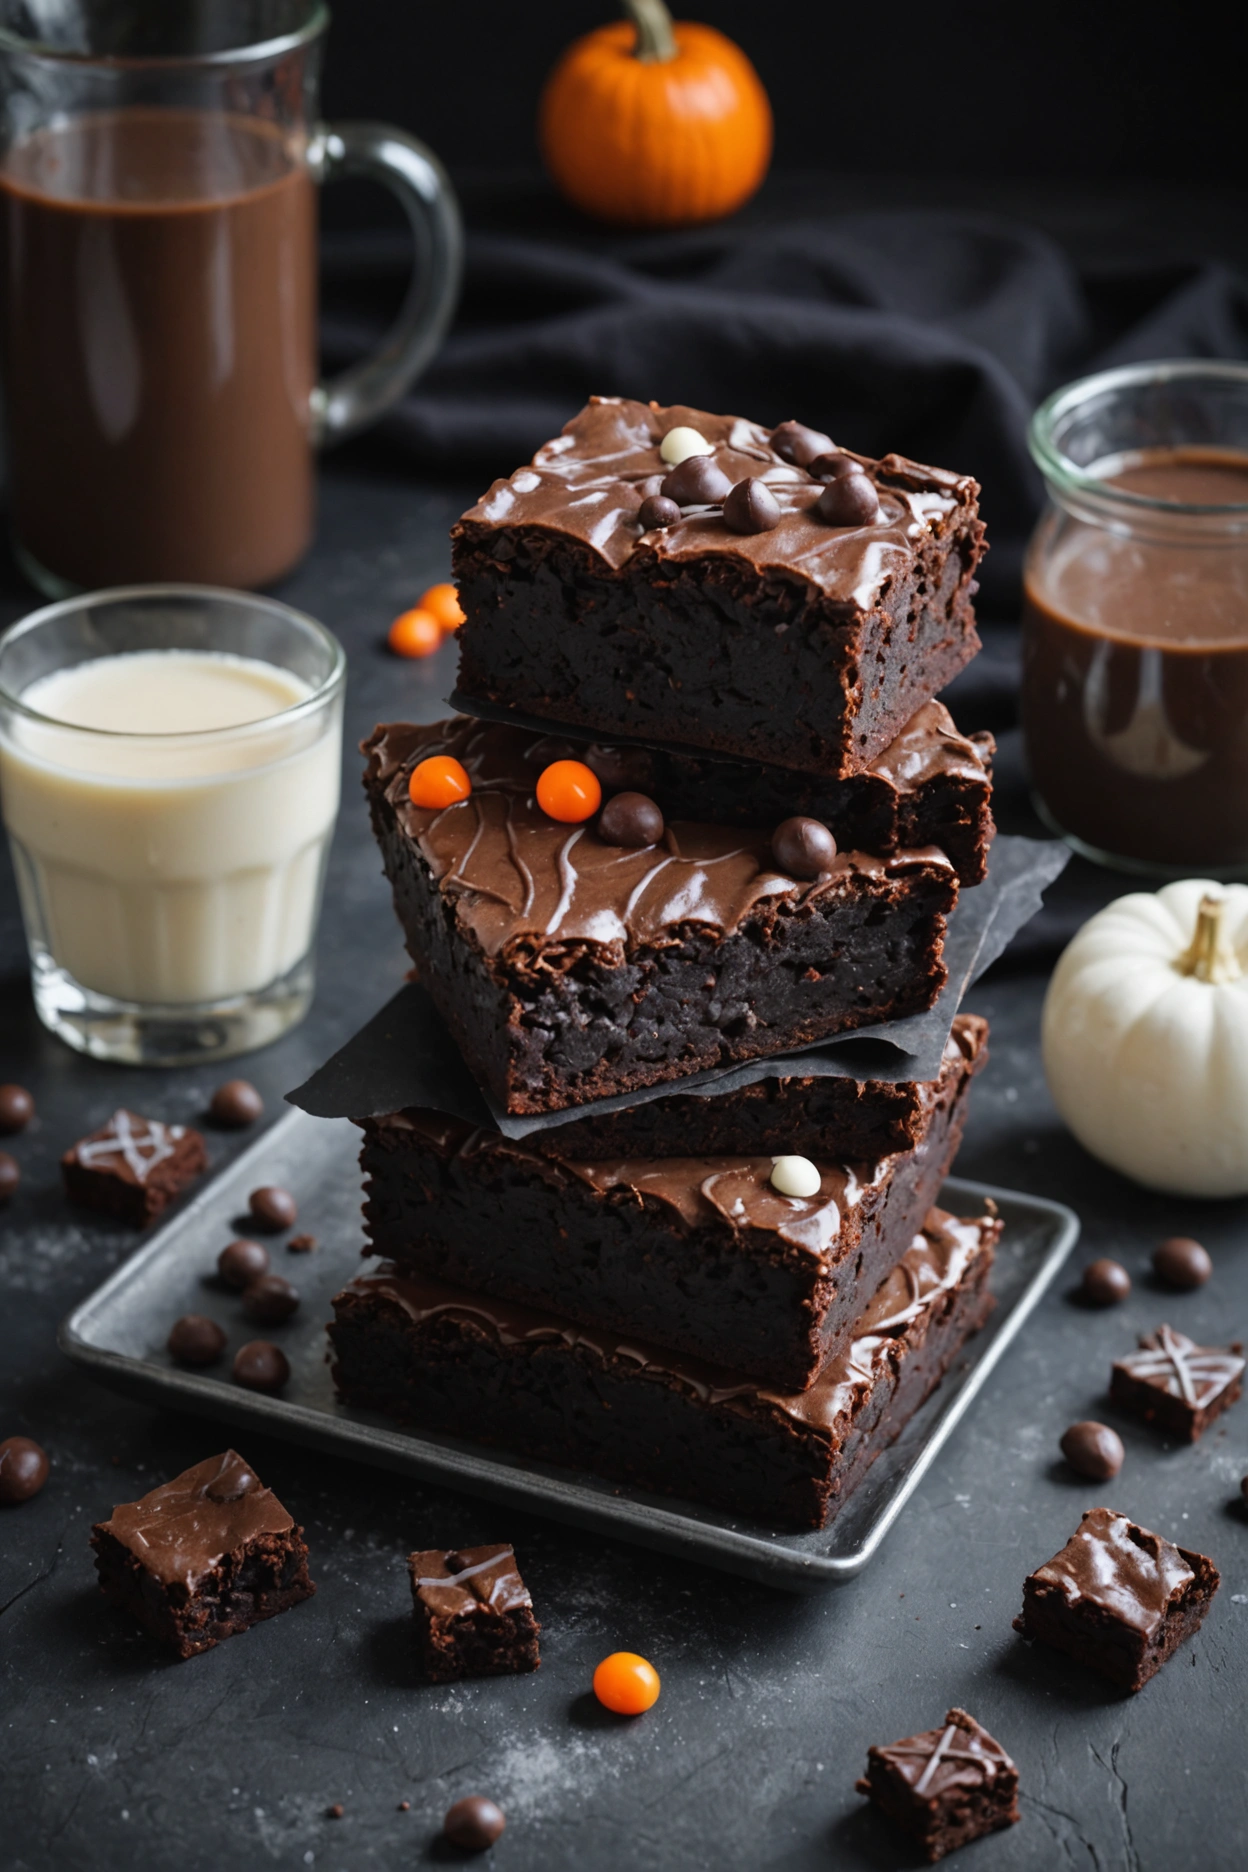
I love the ingredients list in my Witch’s Brew Brownies. I’m a sucker for a rich cocoa powder and lush dark chocolate chunks as the base.
The brownies are perfect for an enchanting party, or just a magical night in!

Ingredients
1 cup unsalted butter, melted
2 cups granulated sugar
4 large eggs
1 teaspoon vanilla extract
1 cup all-purpose flour
1 cup unsweetened cocoa powder
1/2 teaspoon salt
1/2 teaspoon baking powder
1/2 cup dark chocolate chips
Green and purple food coloring
Halloween-themed sprinkles (optional)
Instructions
1. Preheat your oven to 350°F (175°C) and line a 9×13-inch baking pan with parchment paper.
2. Melt the butter and the sugar in a large mixing bowl. Beat together. 3) Add eggs one at a time, making sure to incorporate each one before adding the next one, until all the eggs have been added. 4) Then stir in the vanilla extract.
4. In a separate bowl, sift together flour, cocoa powder, salt and baking powder. Stir the dry ingredients into the wet ingredients until just combined. Fold in dark chocolate chips.
5. Divide the batter into two portions. Color one portion green and the other portion purple with food coloring. Using the prepared baking pan, create a swirl of both batter parts using a toothpick or knife for a marbled effect.
6. Bake for 25 minutes to 30 minutes, or until a toothpick inserted into the center of the pan comes out with only a few moist crumbs. Let the brownies cool completely in the pan before cutting them into squares. If desired, decorate with Halloween sprinkles.
2. Ghostly Meringues
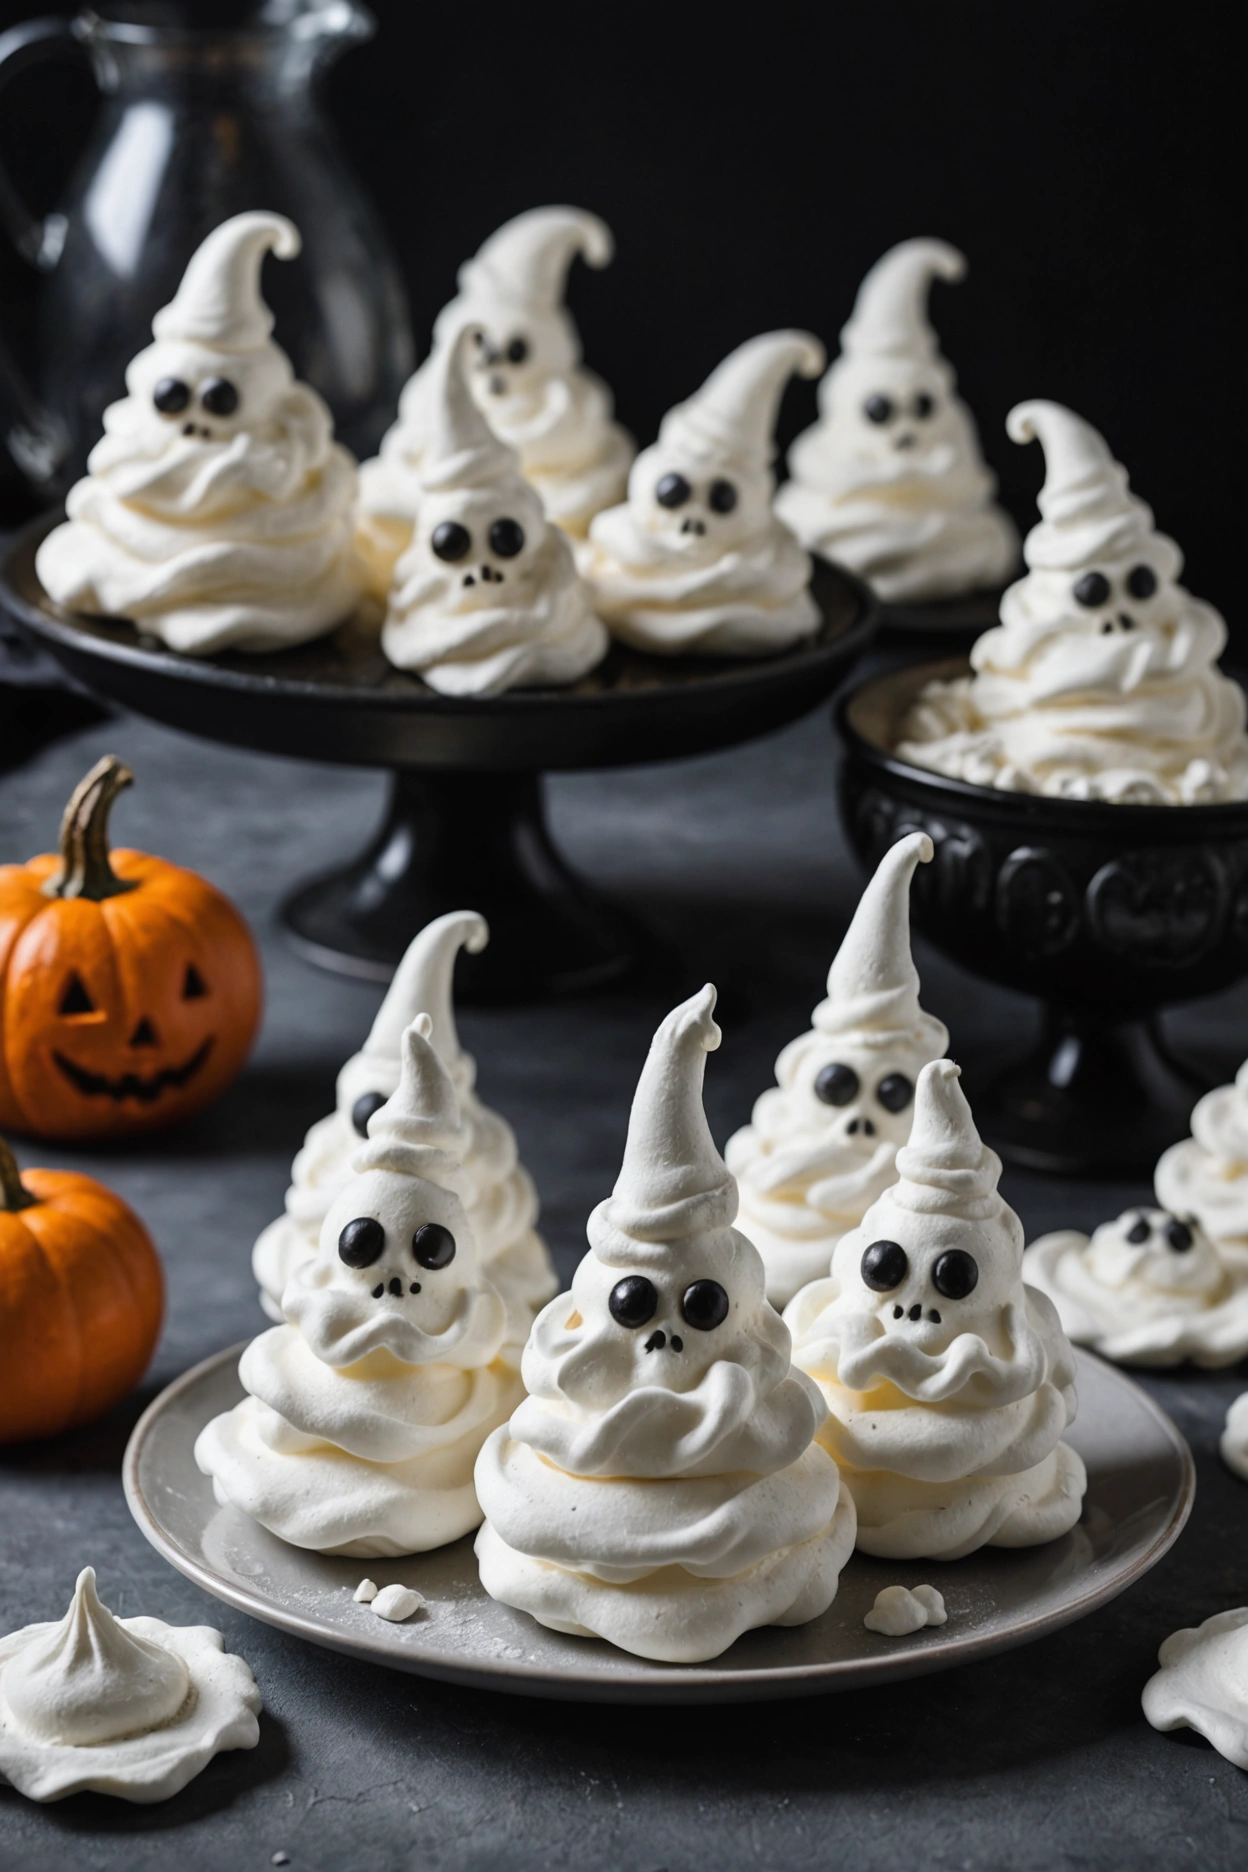
When I think about Halloween treats, little ghost meringues come to mind. I like them because they’re easy to make with a few basic ingredients: egg whites, sugar, cream of tartar, and a drop or two of vanilla extract to taste.
They are the perfect light and sweet spook, just right for your Halloween candy bowl.
Ingredients
- 4 large egg whites, at room temperature
- 1 cup granulated sugar
- 1/4 teaspoon cream of tartar
- 1 teaspoon vanilla extract
- Mini chocolate chips (for eyes)
Instructions
1. Preheat your oven to 225°F (110°C). Line a baking sheet with parchment paper.
2. Beat egg whites in a large, dry bowl at medium speed until foamy. Add the cream of tartar and beat until soft peaks form.
3. Gradually beat in the sugar a tablespoon at a time on high speed until stiff peaks form; the meringue should be glossy and hold its shape.
4. Gently fold in the vanilla extract until well combined.
5. Pipe the meringue into a piping bag fitted with a round tip and reproduce the ghost shapes on the prepared baking sheet.
6. Dot two tiny chocolate chips on each meringue for eyes and bake for 1½ to 2 hours or until dry and hard. Turn off the oven and allow meringues to cool entirely in the oven.
3. Dracula Dentures
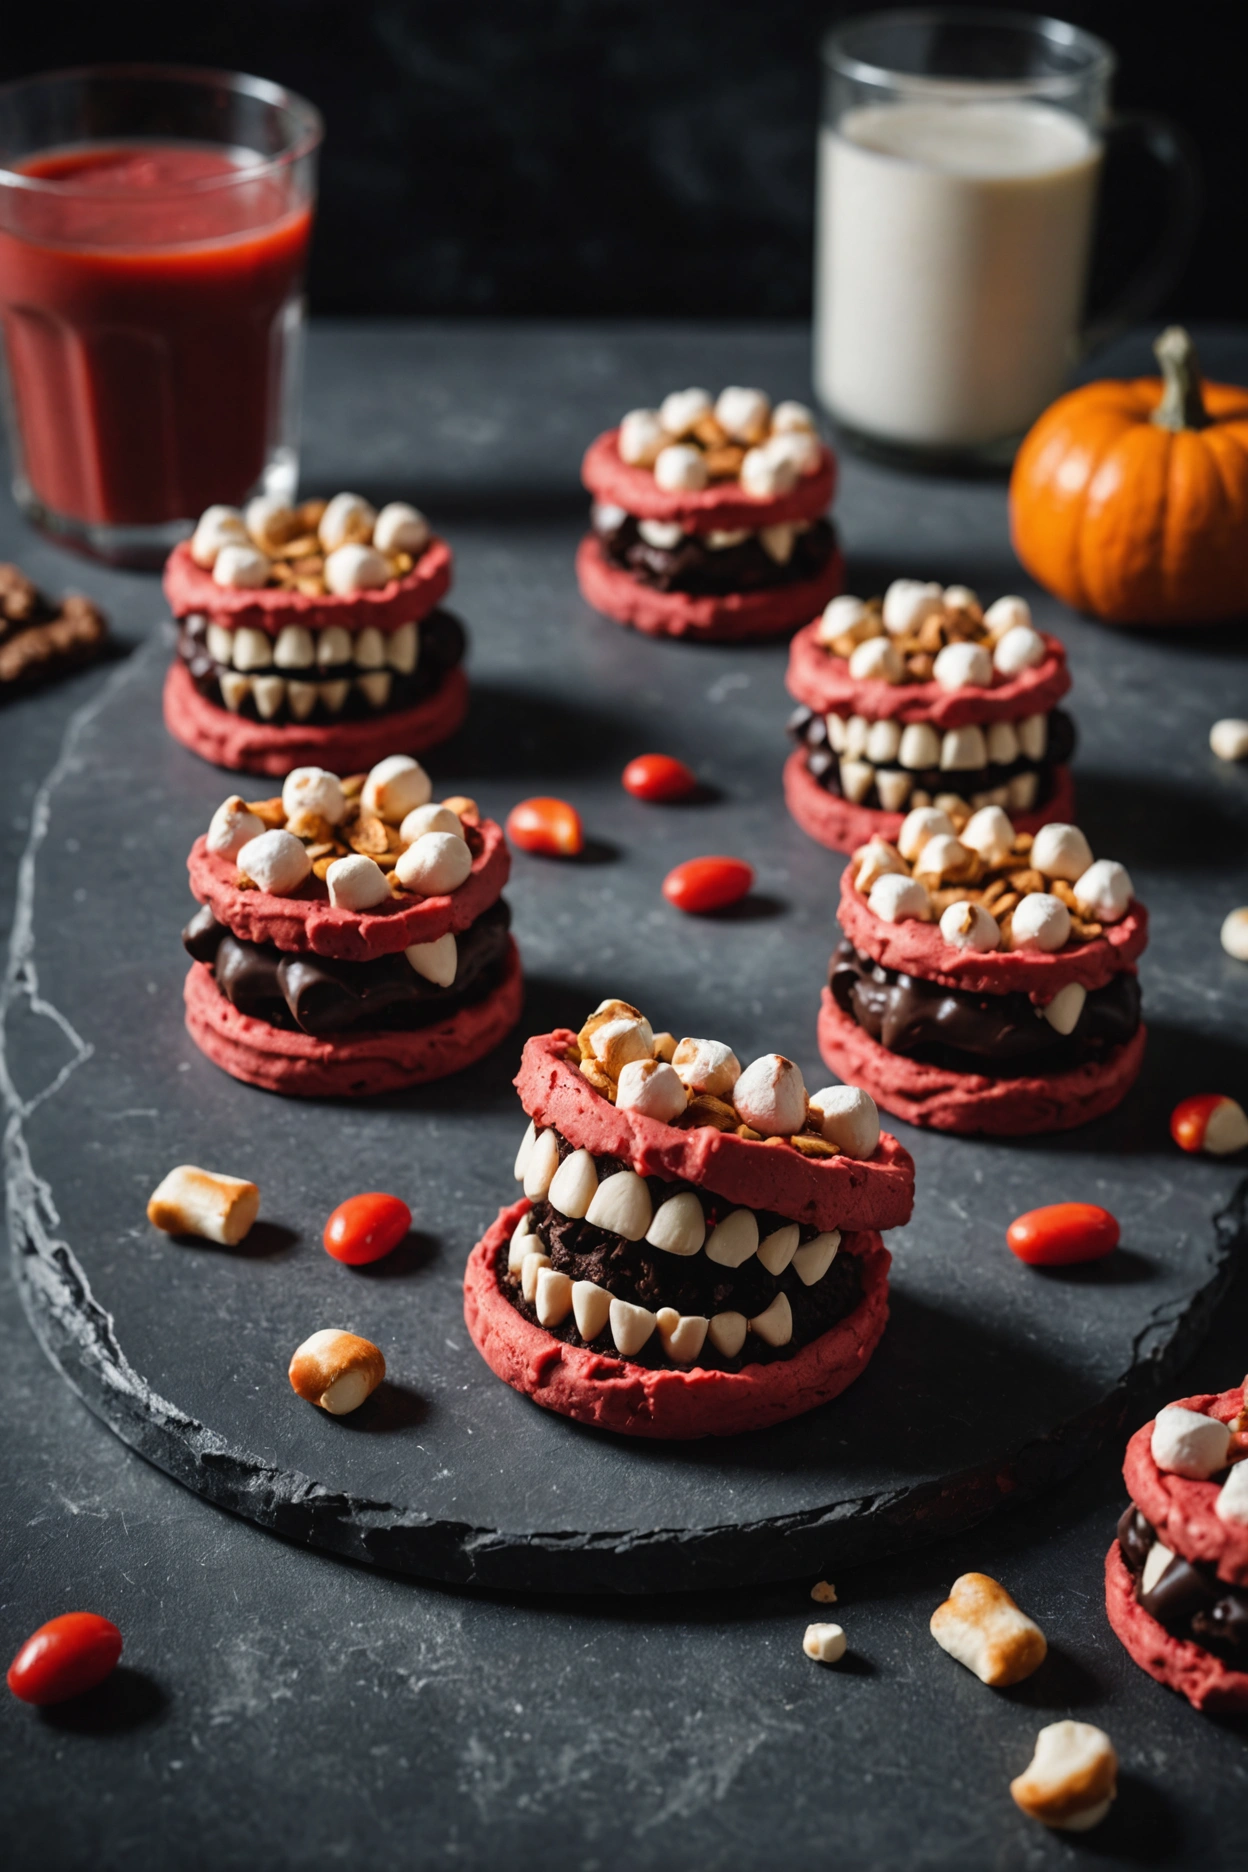
It’s a crafty and a tasty and a-holy-spooky surprise snack for any Halloween party – so get your crafting and sweet-making skills on for a clever creation that really sticks together with a little bit of here, and a little bit of there. Suddenly, all these separate ingredients come together and make for one really freaky fun treat.
To be sure, my kind of candy expression includes something like mini marshmallows that can stand in for teeth, with, say, chewy candy halves to hold together and create the creepily empty gums. And then layers of creamy frosting to hold it all in place.
Ingredients
Chocolate chip cookies
Mini marshmallows
Red frosting
Slivered almonds
Chocolate frosting (optional)
Instructions
1. Cut the chocolate-chip cookies in half. They will be the top and bottom of the ‘dentures’.
2. Spread a layer of red frosting onto the flat side of each cookie half.
3. Put small, round marshmallows along the curved edge of one half of the cookie to represent the teeth.
4. Sandwich the second cookie half on top, flat side down, and press just enough to close the sandwich and hold the marshmallows in.
5. Insert slivered almonds between the marshmallows to represent vampire fangs.
6. (Optional) Spread a layer of chocolate frosting to make the dentures look more realistic. Serve immediately or chill until ready to eat.
4. Haunted Haystacks
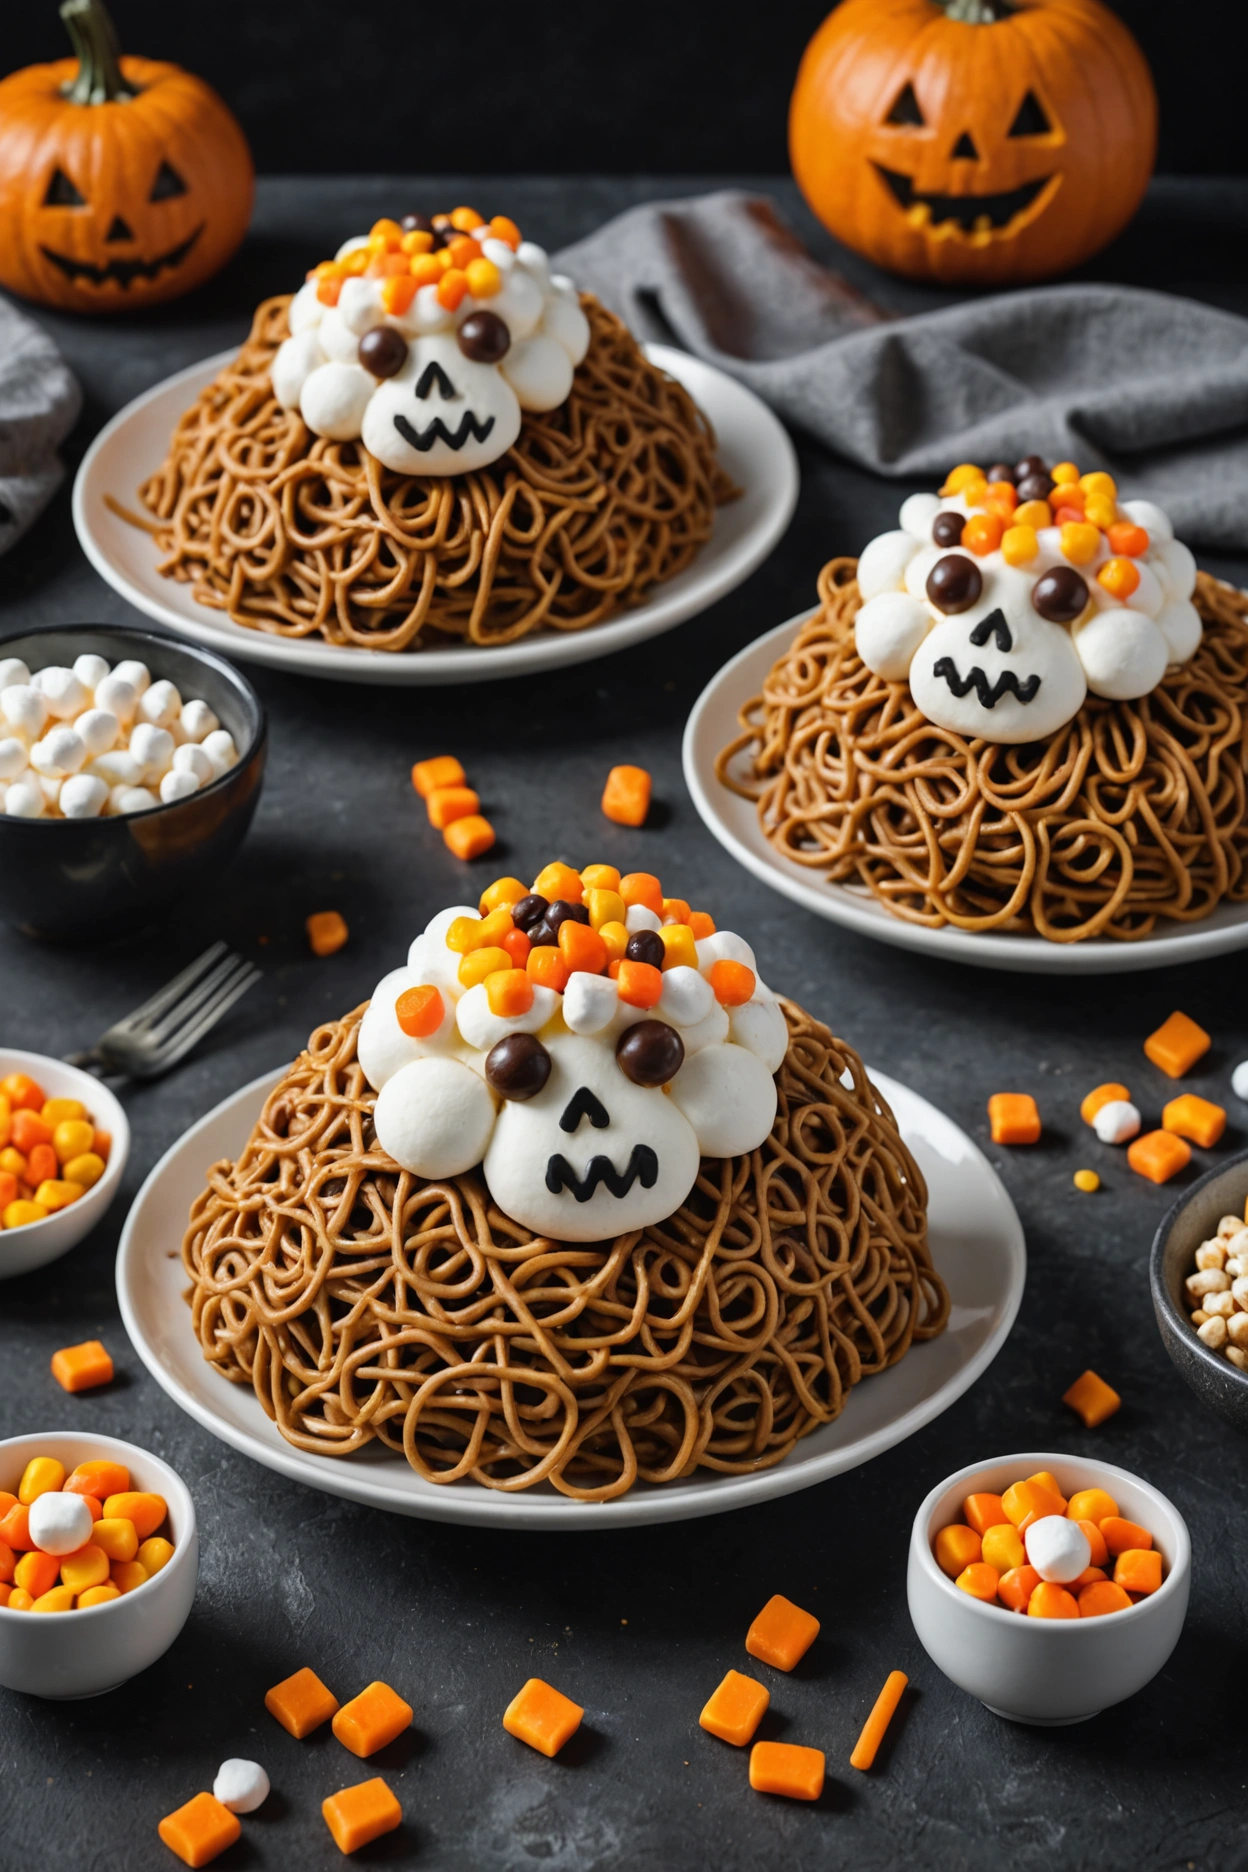
I am a huge fan of seasonal treats all year long. But when the spooky celebration begins, nothing can stop me from sneaking as much Halloween-themed food as I can.
However, I do not want everything I eat to be strictly related to pumpkins or coffin-shaped. That’s where a bunch of creepy-festive treats with a twist come in.
My recipe involves mixing some of the creepiest ingredients I can think of: shredded coconut, butterscotch chips, peanut butter, and chow mein noodles. From my perspective, they all go really well together to create a snack that is both sinister and tasty.
So let’s get creepy and come up with a batch of these hauntingly good haystacks!
Ingredients
- 2 cups chow mein noodles
- 1 cup butterscotch chips
- 1/2 cup creamy peanut butter
- 1/2 cup mini marshmallows
- Candy eyes for decoration
Instructions
1. Line a baking sheet with parchment paper or wax paper.
2. Melt the butterscotch chips and peanut butter together in a microwave or double boiler, stirring every 30 seconds, until smooth.
3. Pour in the chow mein noodles and mini marshmallows, stir until well-coated.
4. Drop the mixture by the spoonful onto the prepared baking sheet to form small haystacks.
5. Dot little haystacks with marshmallows and candy eyes while they are still pliable to give them a ‘haunted’ look.
6. Let cool and set for around 30 minutes before serving. Keep in an airtight container.
5. Mummy Hot Dogs

Halloween is just around the corner and with it all the fun frightful food and decorations. Recently, I discovered this cute twist on an old favorite hot dogs cooked in crescent roll dough and Mummy-fied.
They’re such an easy treat, just a few ingredients hot dogs, crescent roll dough, mustard, and ketchup and ta-da! I like to use a little mustard for the eyes, it’s just really cute, or you can use candy eyes.
This is a great fun meal for kids and adults.
Ingredients
- 1 can of refrigerated crescent roll dough (8 oz)
- 8 hot dogs
- 2 tablespoons mustard or ketchup (for eyes)
- 1 egg (optional, for egg wash)
Instructions
1. Preheat the oven to 375°F (190°C), and line a baking sheet with parchment paper or brush it with oil.
2. Roll out the crescent roll dough and slice into thin strips using a knife or pizza cutter.
3. Wrap each hot dog with the cut strips of dough, leaving one end of each hot dog uncovered so that you have a space to create a face. Overlap and stagger the dough strips to create a pattern that resembles a mummy.
4. If desired, brush the wrapped hot dogs all over with a beaten egg in a small bowl and bake for a golden finish.
5. Put the wrapped franks into the prepared baking sheet and bake for 12-15 minutes, or until dough is golden. To finish, add a squirt of mustard or ketchup to each uncovered hotdog end to create eyes. Serve immediately.
6. Spooky Spiderweb Cupcakes
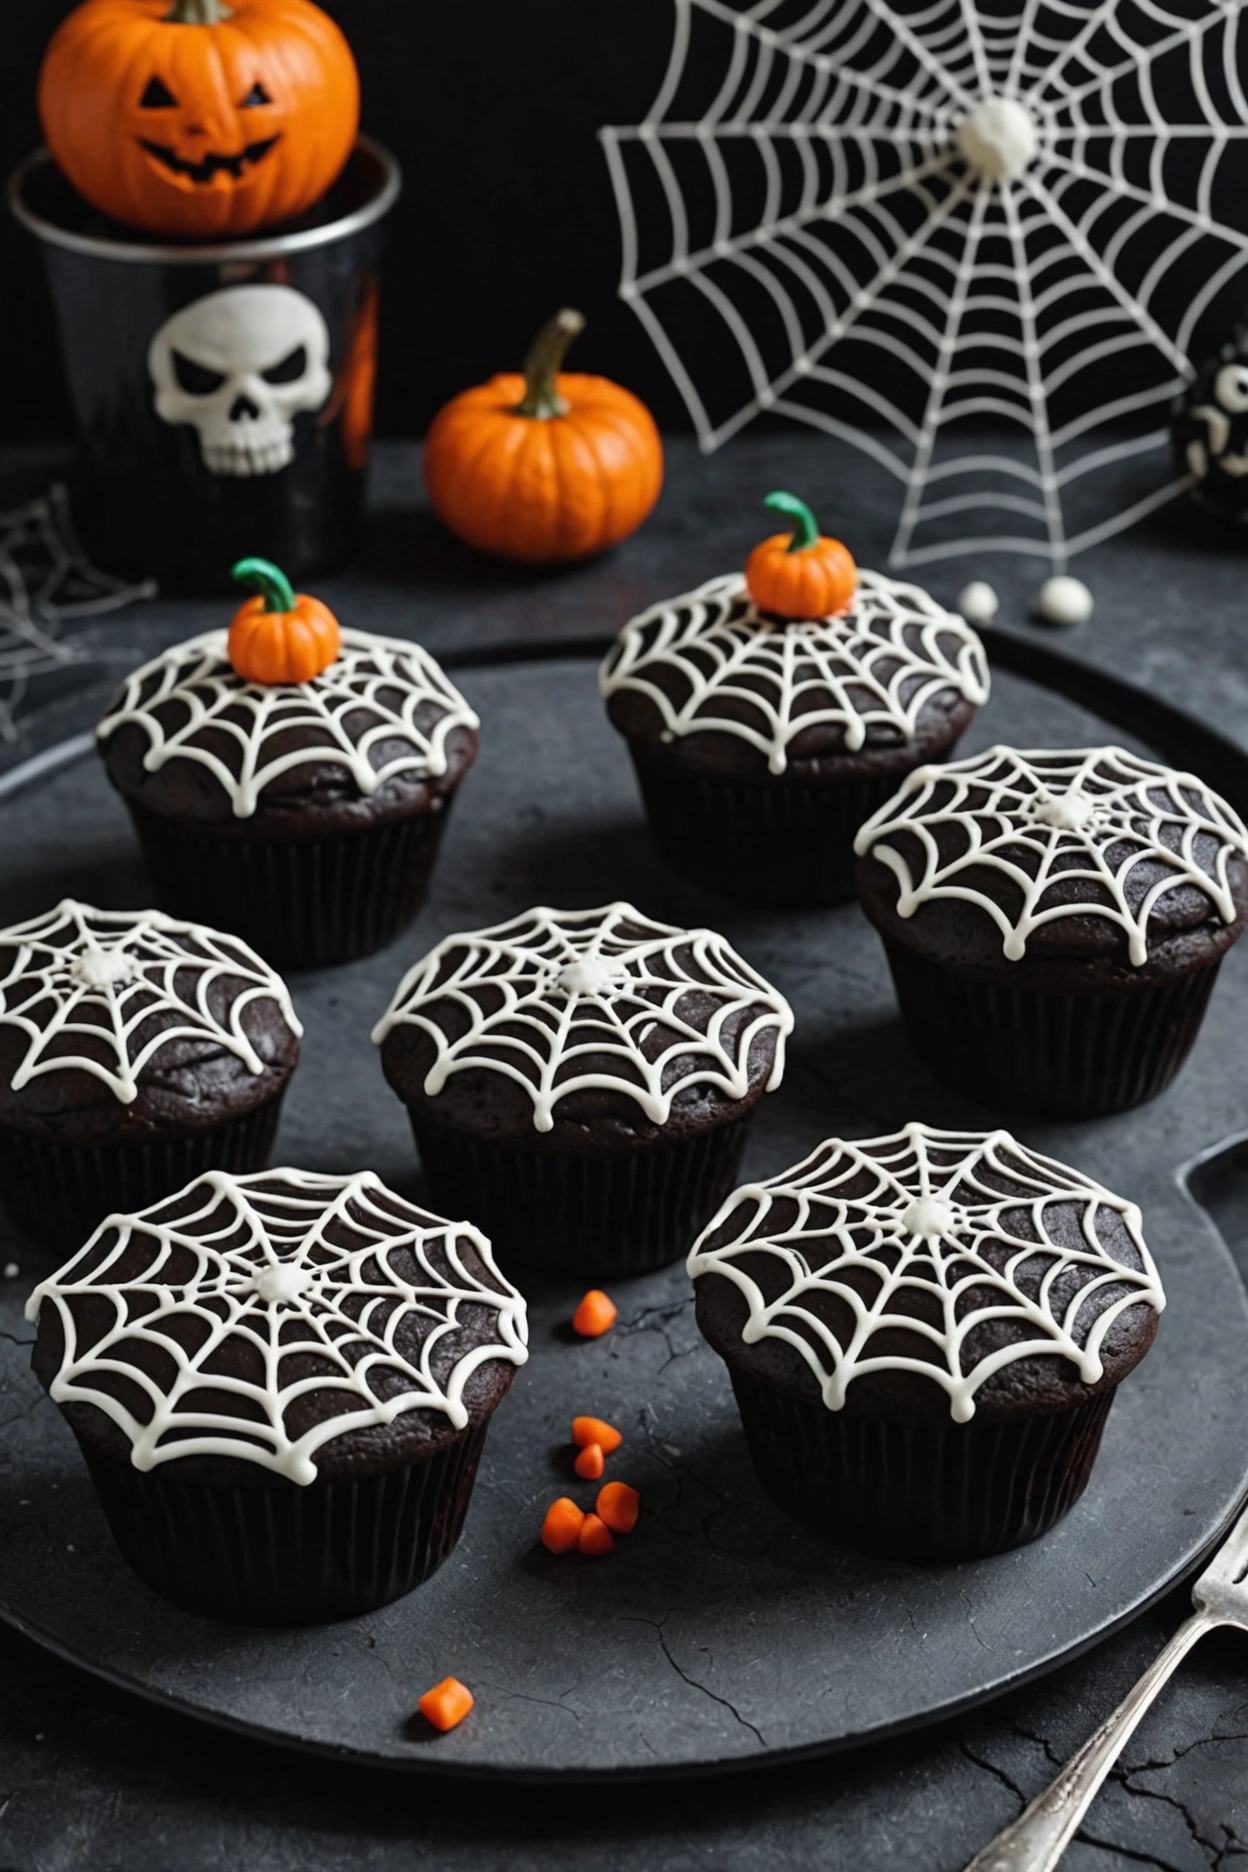
These spider cupcakes are the perfect Halloween treat to turn your party into a bit of a fright. I use just a drop of black food colouring, which, when combined with some vanilla essence, turns the buttercream frosting the perfect, ominous mauve.
The sharp detachment of a dropped chocolate chip gives the best spider bodies, while the addition of cocoa powder in the sponge base is always an indulgence. My piping trick – well, there’s no trick to it because it’s dairy-free!
I just melt some supermarket white chocolate and drizzle it over the buttercream.
Ingredients
- 1 box of chocolate cake mix (plus required ingredients mentioned on the box)
- 1 cup of unsalted butter, softened
- 4 cups of powdered sugar
- 1/4 cup of milk
- 1 teaspoon of vanilla extract
- Black food coloring
- White decorating gel or white chocolate for spiderweb design
- Spider-shaped candies or plastic spider decorations
- Orange and black sprinkles
Instructions
1. Heat the oven to 350°F (or whatever the package instructions tell you) and line a 12-cup muffin tin with cupcake liners.
2. Bake the chocolate cake mix according to package directions; evenly divide batter among cupcake liners; bake and cool completely.
3.In a stand mixer (or with your trusty hand mixer), cream the butter until it’s light and fluffy. Add half of the powdered sugar and the milk along with your two drops of vanilla and beat the mixture until it’s smooth. Add the remaining powdered sugar and continue to beat until there’s no longer any clumps of sugar in your frosting. Slowly add the black gel colouring while continuing to beat your frosting, watching until you’ve reached the ideal spooky black shade.
4. Ice the cupcakes with the black buttercream and smooth with an offset spatula.
5. Outline a coil from the centre of each cupcake with the white decorating gel or melted white chocolate. Drag a toothpick from centre to the edges at even intervals to pull the coil out into spiderweb.
6. Enjoy
7. Eyeball Cake Pops

Scary-delicious creations are my thing, and nothing conjures up intrigue at a Halloween party quite like dripping eyeball cake pops. To craft my deliciously gruesome edibles, I make sure I have the classic staples on hand, including crumbled cake mix, bright food coloring and smooth frosting, with a healthy dose of candy melts and edible gel pens added to the mix, so I can design my creepy pupils and irises schemes.
I draw on these ingredients not just to bring out the creative baker in me, but to ensure my guests get the full effect.
Ingredients
- Cake mix (pick-your-own flavor) and ingredients to bake it
- 1 can of frosting (vanilla or cream cheese recommended)
- White candy melts
- Red candy melts (for veins)
- Black candy melts or black edible marker (for pupils)
- Colored candy melts (for irises, e.g., blue, green, or brown)
- Cake pop sticks
- Styrofoam block or cake pop stand (for drying)
Instructions
-
Bake the Cake:
- Follow the instructions on the cake mix box to bake the cake. Allow it to cool completely.
-
Crumble the Cake:
- Once cooled, crumble the cake into fine crumbs in a large mixing bowl.
-
Mix with Frosting:
- Add a few spoonfuls of frosting to the crumbled cake. Mix until the mixture has a dough-like consistency. You want it to be moist enough to hold together but not too sticky.
-
Form the Cake Balls:
- Roll the mixture into small balls (about 1-1.5 inches in diameter). Place them on a baking sheet lined with parchment paper.
-
Chill the Cake Balls:
- Place the cake balls in the refrigerator for at least 2 hours or in the freezer for about 30 minutes until they are firm.
-
Prepare the Candy Melts:
- Melt the white candy melts according to the package instructions. In separate bowls, melt the colored candy melts and red candy melts as well.
-
Insert Cake Pop Sticks:
- Dip the tip of each cake pop stick into the melted white candy melts and insert it halfway into each cake ball. This helps secure the stick.
-
Coat the Cake Pops:
- Dip each cake ball into the melted white candy melts, ensuring it’s fully coated. Allow any excess to drip off. Place the cake pops in the Styrofoam block or cake pop stand to dry and harden.
-
Create the Eyes:
- Once the white coating has hardened, dip a small brush or toothpick into the colored candy melts and create a circle in the center of each cake pop to form the iris.
- Use the black candy melts or an edible marker to create a small dot in the center of the iris for the pupil.
-
Add the Veins:
- Use a small brush or toothpick to draw thin, jagged lines from the iris outward using the red candy melts, creating the appearance of veins.
-
Dry and Serve:
- Allow the cake pops to dry completely. Once dry, they’re ready to be served!
These spooky Halloween cake pop eyes are sure to be a hit at your Halloween party!
8. Pumpkin Patch Dirt Cups

It doesn’t matter what time of the year it is, but one of my most favorite fall themed treats layered with chocolate pudding, chocolate crushed cookies, and little chocolate candy pumpkins.
Ingredients
- 1 package (3.9 ounces) instant chocolate pudding mix
- 2 cups cold milk
- 1 package (14.3 ounces) Oreo cookies, crushed
- 1 container (8 ounces) whipped topping, thawed
- 8 small pumpkins-shaped candies
- 8 small clear plastic cups
- 4 pretzel sticks
Instructions
1. In a large bowl, beat the chocolate pudding mix and cold milk together with a whisk until thickened. Chill for 5 minutes.
2. Gently fold in the whipped topping with the thickened pudding until fully combined.
3. Place a layer of crushed Oreos at the bottom of each plastic cup.
4. Spoon the pudding mixture over the Oreo layer in each cup, filling about three-quarters of the way full.
5. Top the cups with remaining crushed Oreos to resemble “dirt.”
6. Stick a candy pumpkin and a piece of pretzel stick in each cup for a pumpkin stem.
9. Creepy Critter Cookies
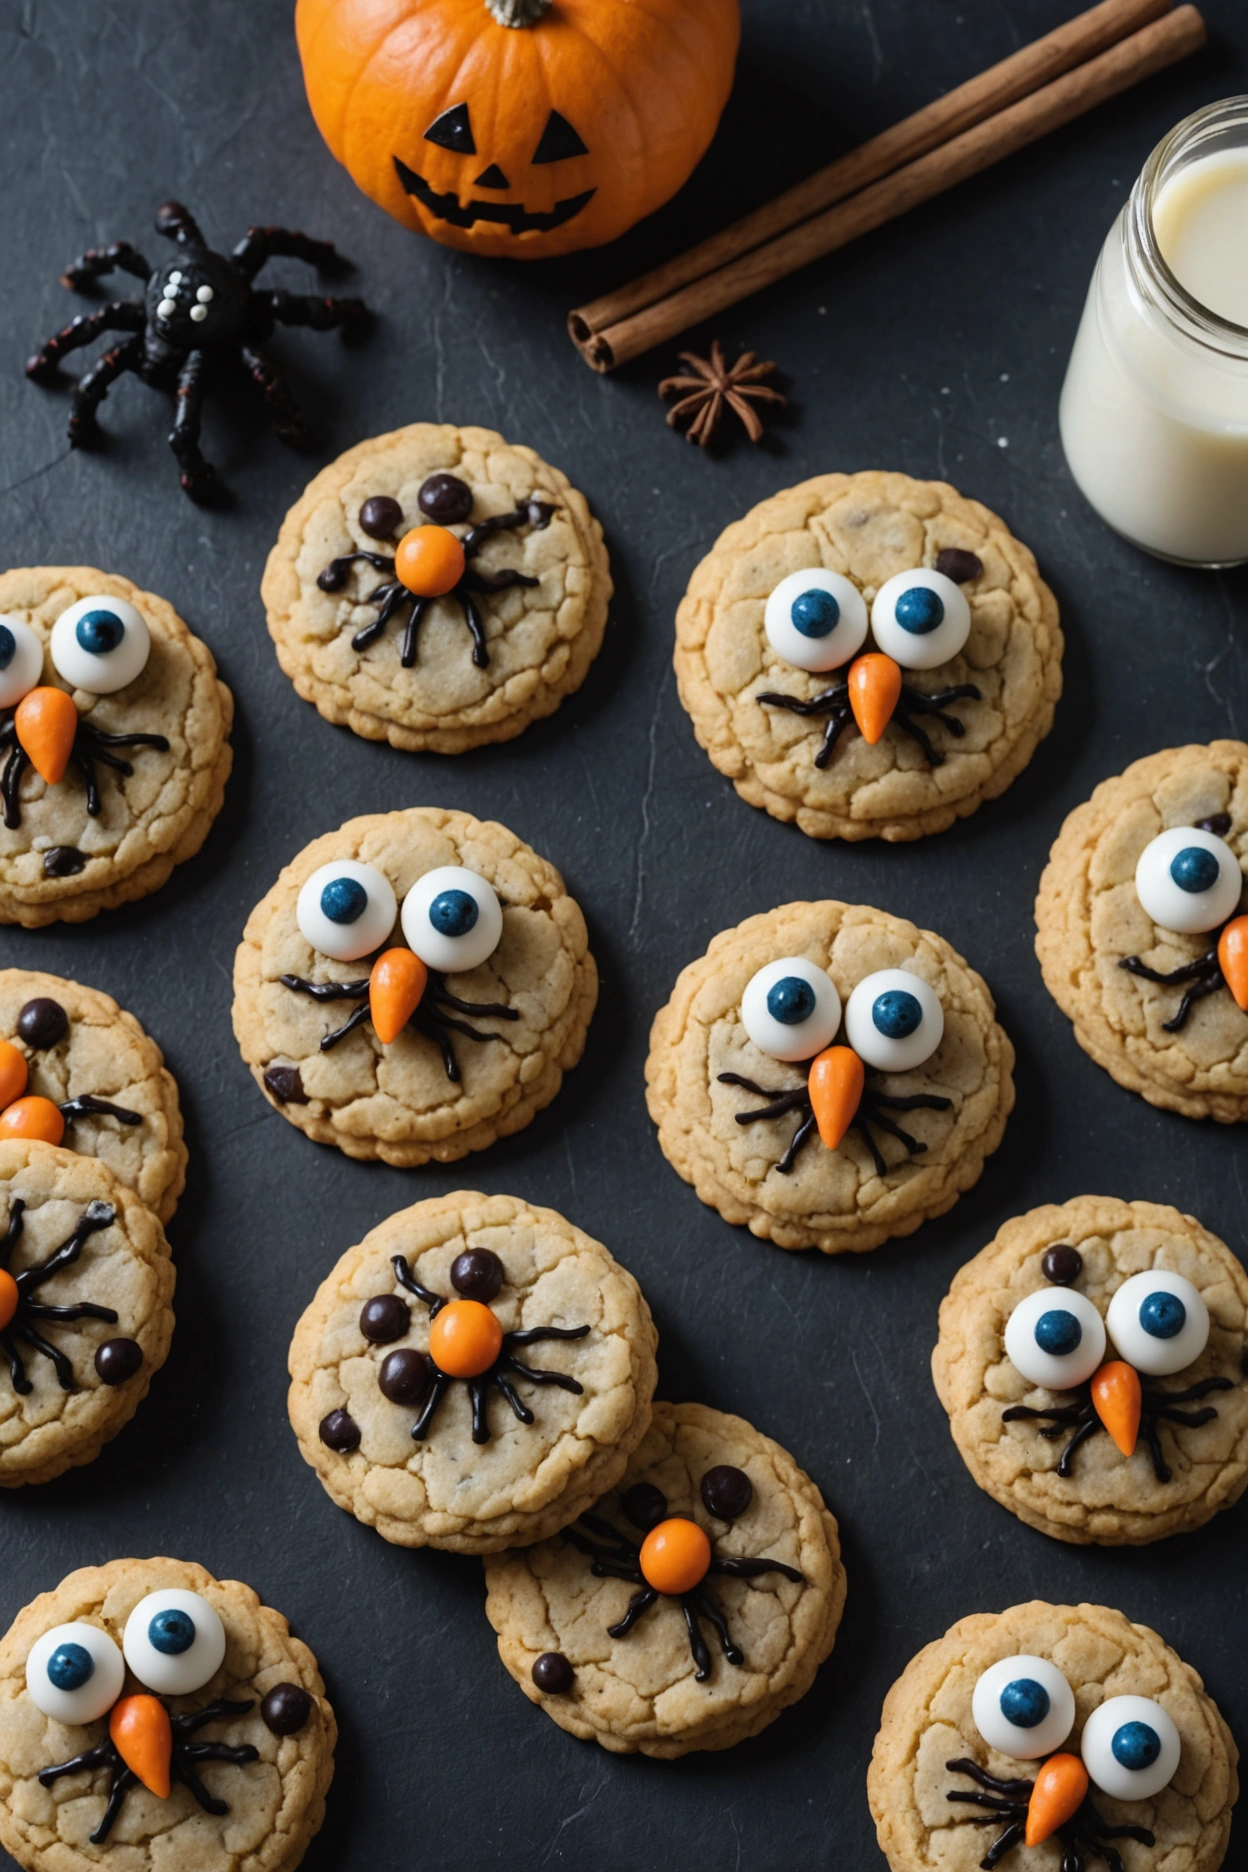
When I want to scare and delight little ghouls and goblins, nothing works better than baking some eerie and cute cookies. Adding a little dark cocoa to the dough will give it a haunting vibe.
I like some added crunch of chocolate chips to look like bug eyes. Don’t forget bright-eyed candy eyeballs to bring my creepy critters to life.
Ingredients
- 1 cup unsalted butter, softened
- 1 cup granulated sugar
- 1 cup brown sugar, packed
- 2 large eggs
- 1 teaspoon vanilla extract
- 2 1/2 cups all-purpose flour
- 1 teaspoon baking soda
- 1/2 teaspoon baking powder
- 1/2 teaspoon salt
- 1 1/2 cups chocolate chips
- Candy eyes
- Mini pretzel twists or legs (optional)
Instructions
1. Preheat the oven to 350°F (175°C) and line baking sheets with parchment paper.
2. In a large bowl, cream the butter, granulated sugar, and brown sugar until fluffy. Beat in the eggs one at a time; stir in the vanilla extract.
3. In a medium bowl, whisk together the flour, baking soda, baking powder and salt, then add to the wet mixture, mixing just until combined. Fold in the chocolate chips.
4. Scoop out dough by tablespoonful onto prepared baking sheets. Press candy eyes into each cookie to give it a ‘critter’ appearance.
5. For an extra touch, slip a mini pretzel twist into each side to look like legs.
6. Bake for 10-12 minutes, or until edges are lightly golden. Let cookies cool on the baking sheet for five minutes, then transfer to a wire rack to cool completely. Enjoy your deliciously spooky treats!
10. Poison Apple Pops
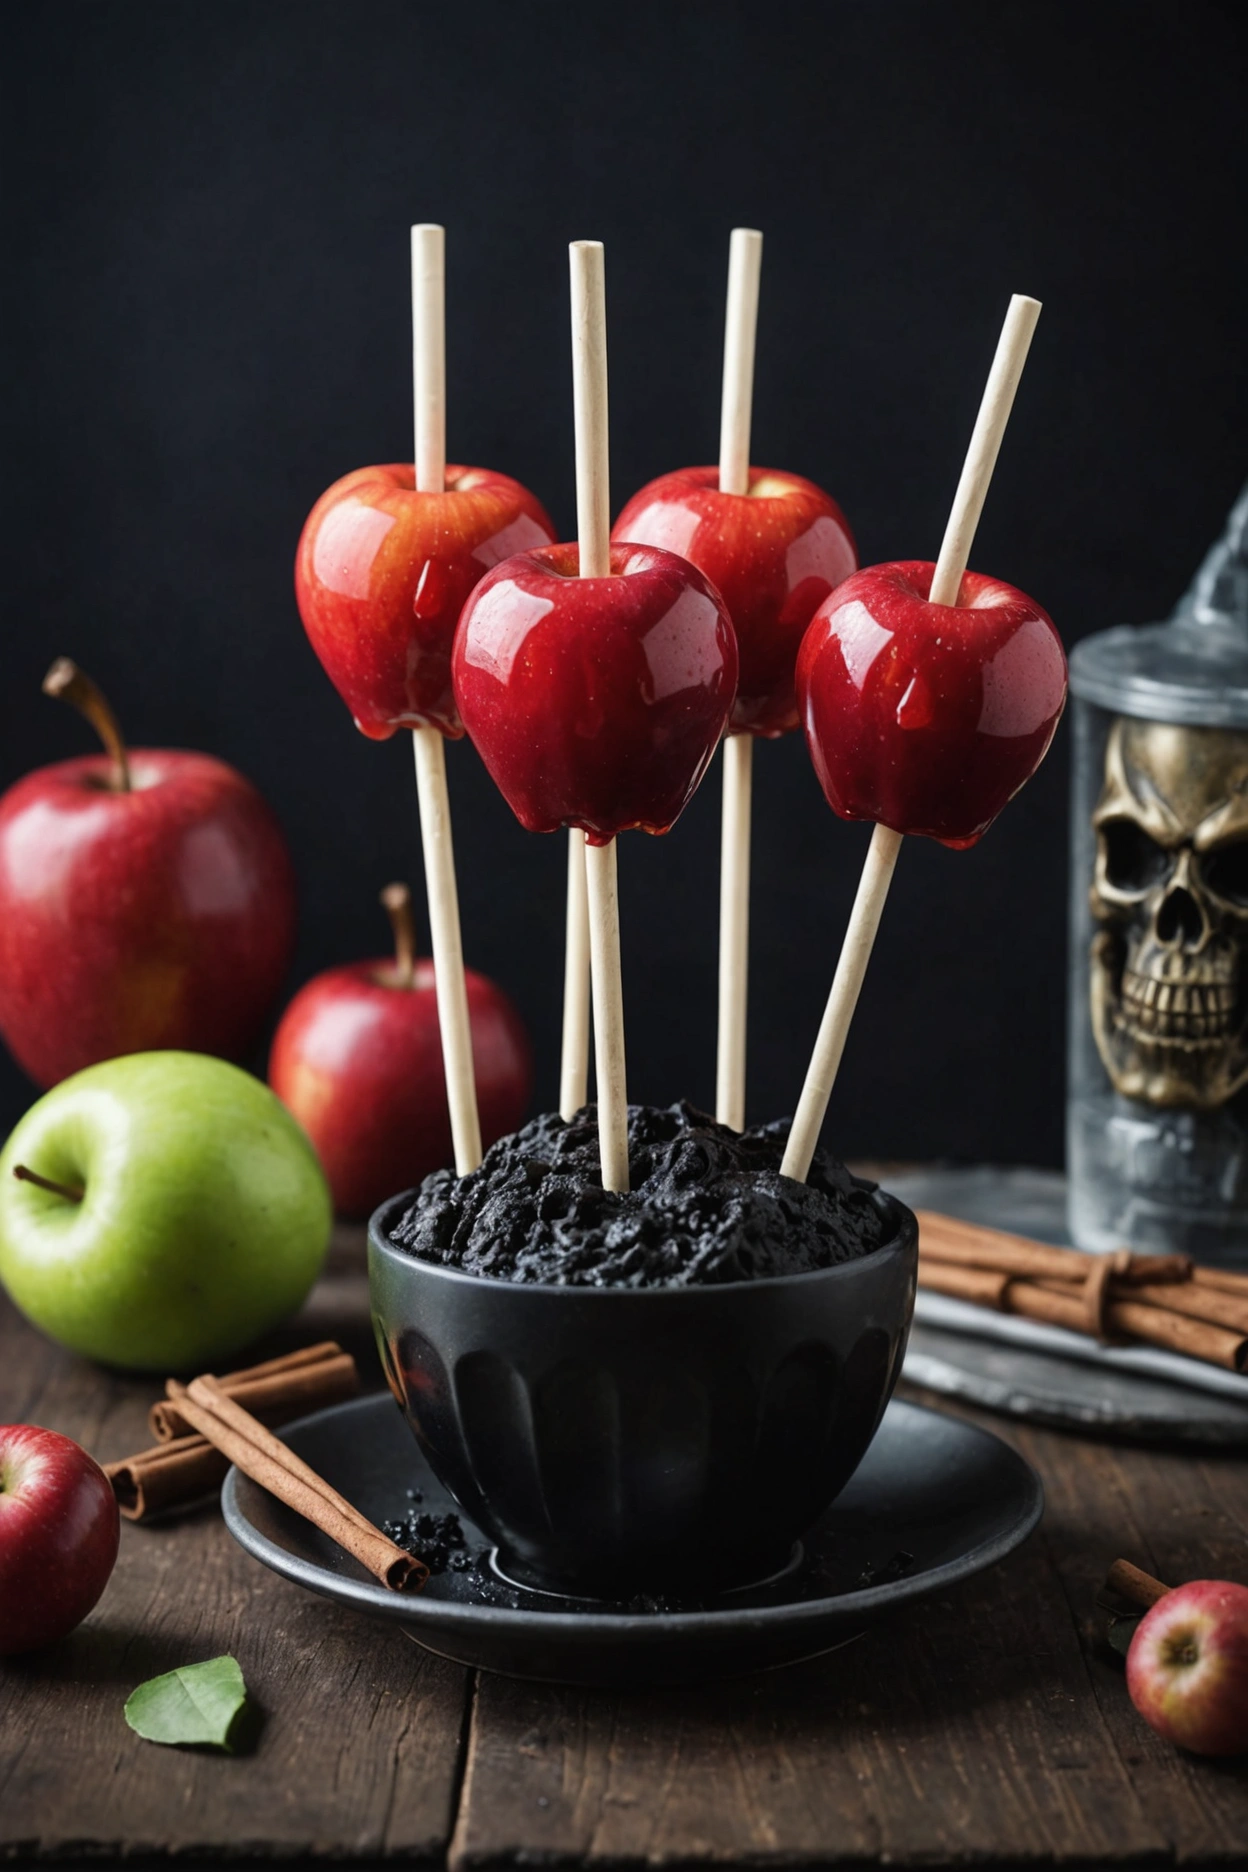
Apples, caramel, cinnamon (my favorite autumn spice) – their flavors are the essence of the season.
I also add edible glitter (it’s never too early to practise for the holidays). And a pinch of sea salt to bring out the flavor of the caramel, of course.
Ingredients
6 small apples
2 cups granulated sugar
1/2 cup light corn syrup
3/4 cup water
1/2 teaspoon black gel food coloring
1/4 teaspoon cinnamon extract (optional)
6 wooden sticks or lollipop sticks, for the apples
Instructions
1. Scrub and dry your apples, cut off the stem, and make a hole in them by inserting a wooden stick into the top.
2. Put the granulated sugar, light corn syrup and water in medium saucepan and set over medium heat, stirring until the sugar is dissolved.
3. Put the saucepan on medium-high heat and bring to a boil without stirring. Measure the temperature with a candy thermometer, and take off the heat once it’s at 290°F (hard crack stage).
4. Take the saucepan off the heat. Gently stir in the black food coloring gel paste (and the cinnamon extract, if using).
5. Dip each apple into the hot syrup mixture, turn to cover all sides. Allow any excess syrup to drip off before placing it on a parchment-lined baking sheet to cool and harden.
6. Let the Poison Apple Pops cool completely before serving. Enjoy your spooky Halloween desserts!
11. Bat Wing Pretzels
Putting together creative and scary recipes is my favorite thing to do as the leaves change in October. These black-and-white cookies use some unexpected ingredients that you’re going to like because I know you’re going to dig the black cocoa powder to add some color and the salty and savory kick that garlic powder brings to the table.
Ingredients
- 1 1/2 cups warm water (110°F)
- 1 packet active dry yeast (2 1/4 teaspoons)
- 1 tablespoon granulated sugar
- 4 cups all-purpose flour
- 1 teaspoon salt
- 2/3 cup baking soda
- 1 large egg, beaten with 1 tablespoon of water (egg wash)
- Black food coloring (gel or liquid)
- Coarse sea salt (for sprinkling)
Instructions
1. Whisk the warm water and sugar together in a big bowl, then sprinkle the yeast over the top and let it sit for 5 minutes or until it’s foamy.
2. Add the flour and salt to the yeast mixture and then use food coloring until the dough is the color of your choosing Knead until the dough is smooth and elastic, cover and leave to rise for about an hour in a warm place, until it’s doubled in size.
3. Set oven to 450°F (232°C). Add the baking soda to the full pot of water and bring to a boil in a large stockpot on the stove.
4. Cut dough into 8-10 pieces and, using your fingertips, roll each piece into a long rope, then shape into a bat wing by forming the letter ‘W’ to make a bat wing with pointed ends.
5. Place each dough ‘shoe’ in the boiling water for approximately 20-30 seconds, then flip it and let it stay until it rises on the surface of the water. With a slotted spoon, remove the ‘shoe’ and place it on a baking sheet lined with parchment paper.
6. Dip each boiled pretzel in the egg wash, sprinkle with coarse sea salt, then bake for 10-12 minutes until dark golden brown. Cool briefly before serving.
12. Frankenstein Marshmallow Pops
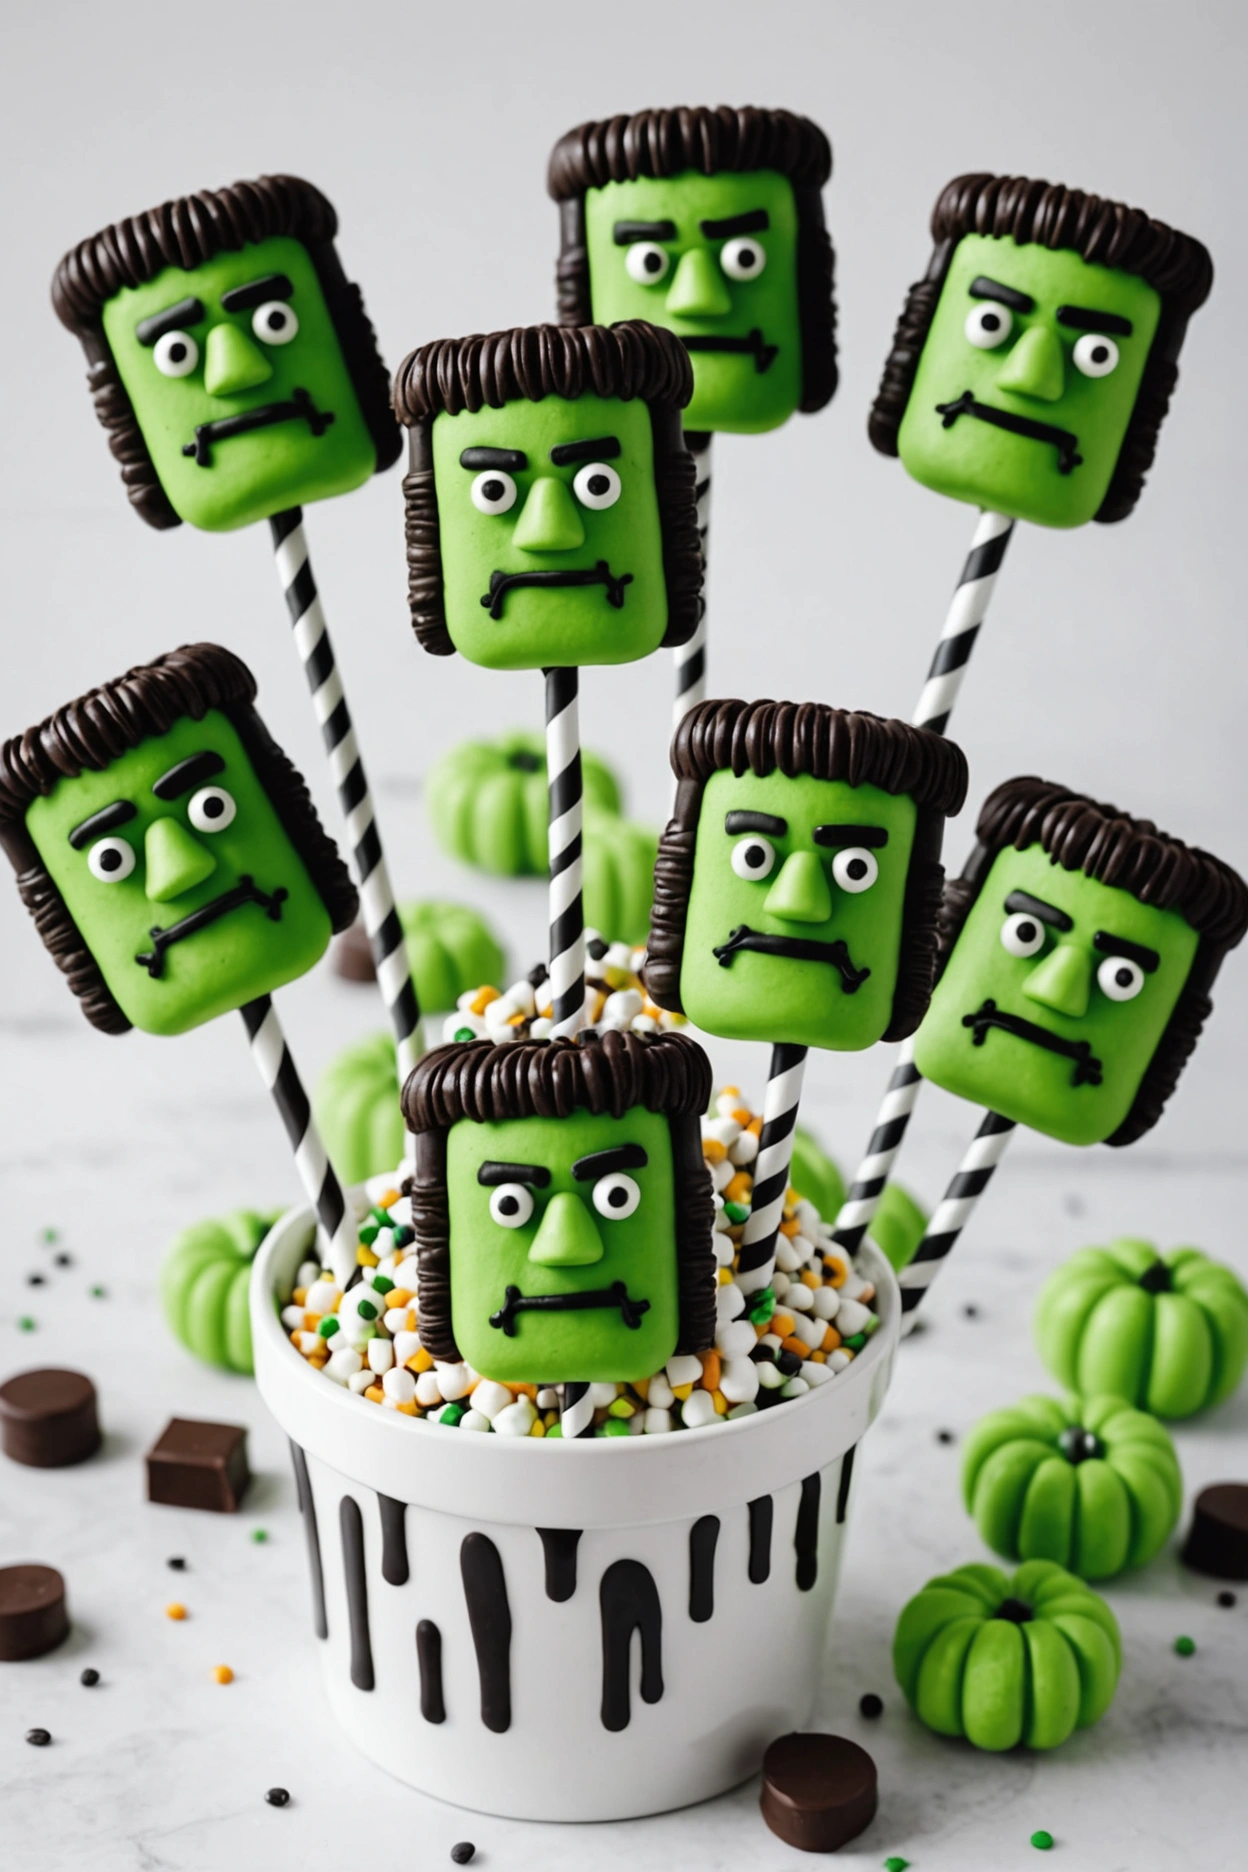
They are so much fun to make, and they definitely get me into the Halloween spirit! Plus, the pops are delicious!
I just love them! All you need is a tasty base of marshmallows, some green candy melts for the Frankenstein colour, and chocolate sprinkles for the hairs that are starting to pop out!
I added a few candy eyes to the pops.
I hope you all love these sweet treats as much as I do!
Ingredients
- 12 large marshmallows
- 12 lollipop sticks or pretzel sticks
- 1 cup green candy melts
- 1/2 cup mini chocolate chips
- 1/4 cup chocolate sprinkles
- 1/4 cup black decorating gel or icing pen
- 1/4 cup white decorating gel or icing pen
Instructions
1. Insert a lollipop stick or pretzel stick into each marshmallow.
2. Melt the green candy melts
3. Dip each marshmallow in melted green candy (leave extra in your bowl) to completely cover it. Let excess drip off.
4. Place the coated marshmallows on a parchment-lined baking sheet.
5. Before the coating dries, top each marshmallow with two candied eyes.
6. Finally, add some melted chocolate sprinkles for hair on the top and draw mouths and scars with black and white decorating gel. Let them set, then serve.
14. Monster Mash Popcorn Balls
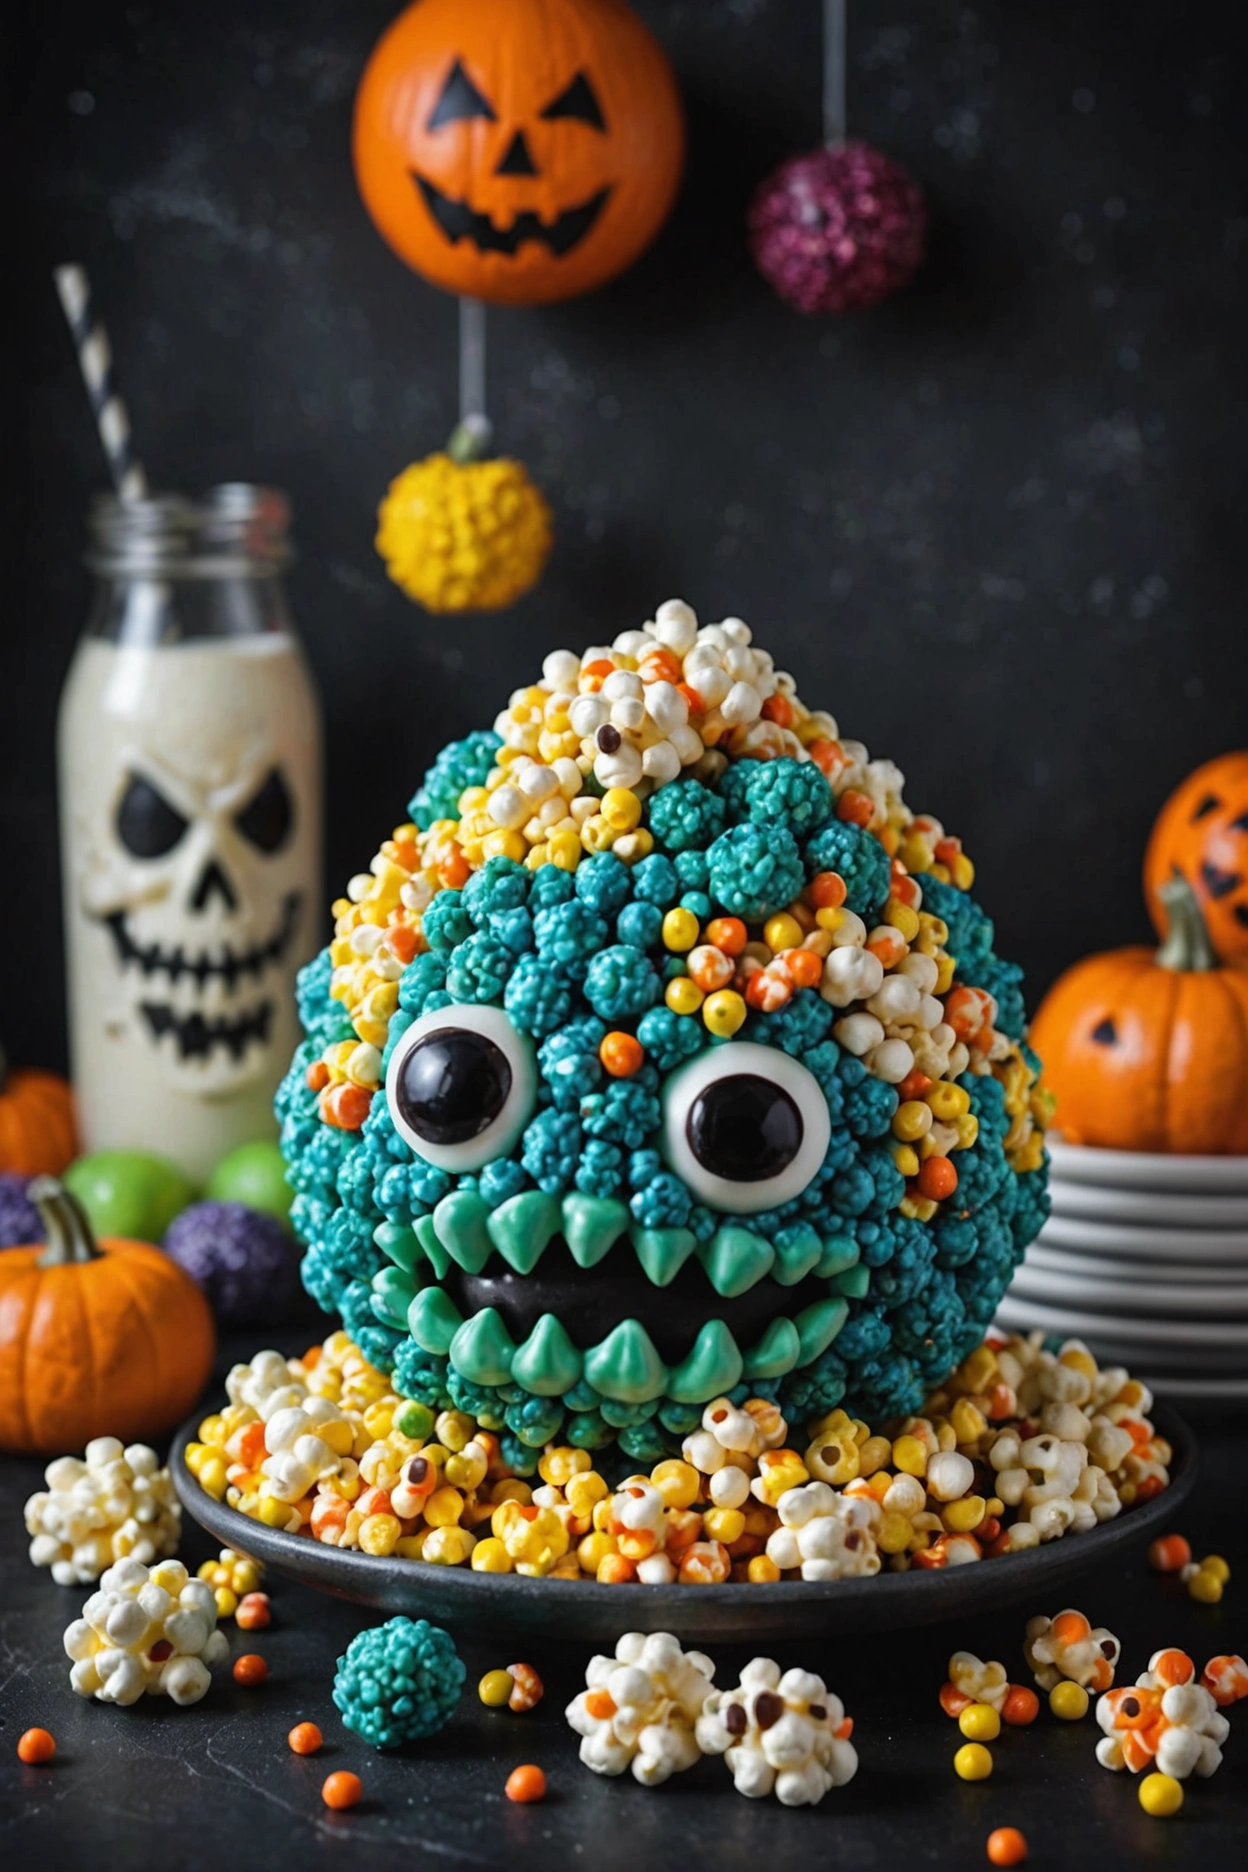
For these halloween treats, I use multicolor candy bits, marshmallows, drizzle of chocolate and more. It will bring out the spooky effect.
Don’t forget to add mini pretzel and sprinkles for crunch. Gummy worm and candy eyeball is a must to make these popcorn balls spooky.
Sweet, Salty and fun. These Halloween popcorn balls are Must have for your party. Also try experimenting with different food colorings.
Ingredients
- 12 cups popped popcorn
- 1 cup granulated sugar
- 1 cup light corn syrup
- 1/4 cup unsalted butter
- 1/4 teaspoon salt
- 1 teaspoon vanilla extract
- Food coloring (optional)
- Assorted candy eyes, sprinkles, and other edible decorations
Instructions
1. In a large bowl, place the 12 cups of popped popcorn.
2. In a medium saucepan, add the sugar, corn syrup, butter, and salt and cook on medium heat, stirring occasionally, until it starts to boil.
3. Bring to a boil and cook unstirred for 2-3 minutes, then take it off the heat, stir in the vanilla and food colouring if using.
4. Stir with spatula or wooden spoon, making sure the popcorn is all coated with the hot syrup mixture.
5. Let the pumpkin popcorn-sprinkle mixture cool slightly so that you can handle it, which will only take a few minutes. Take small handfuls of the popcorn mixture and mould into balls about the size of a baseball. Press in candy eyes, sprinkles, and any other decorations as desired.
6. Set the popcorn balls to cool on a parchment-lined baking sheet before serving or wrapping individually in plastic wrap for storage.
15. Black Cat Oreos
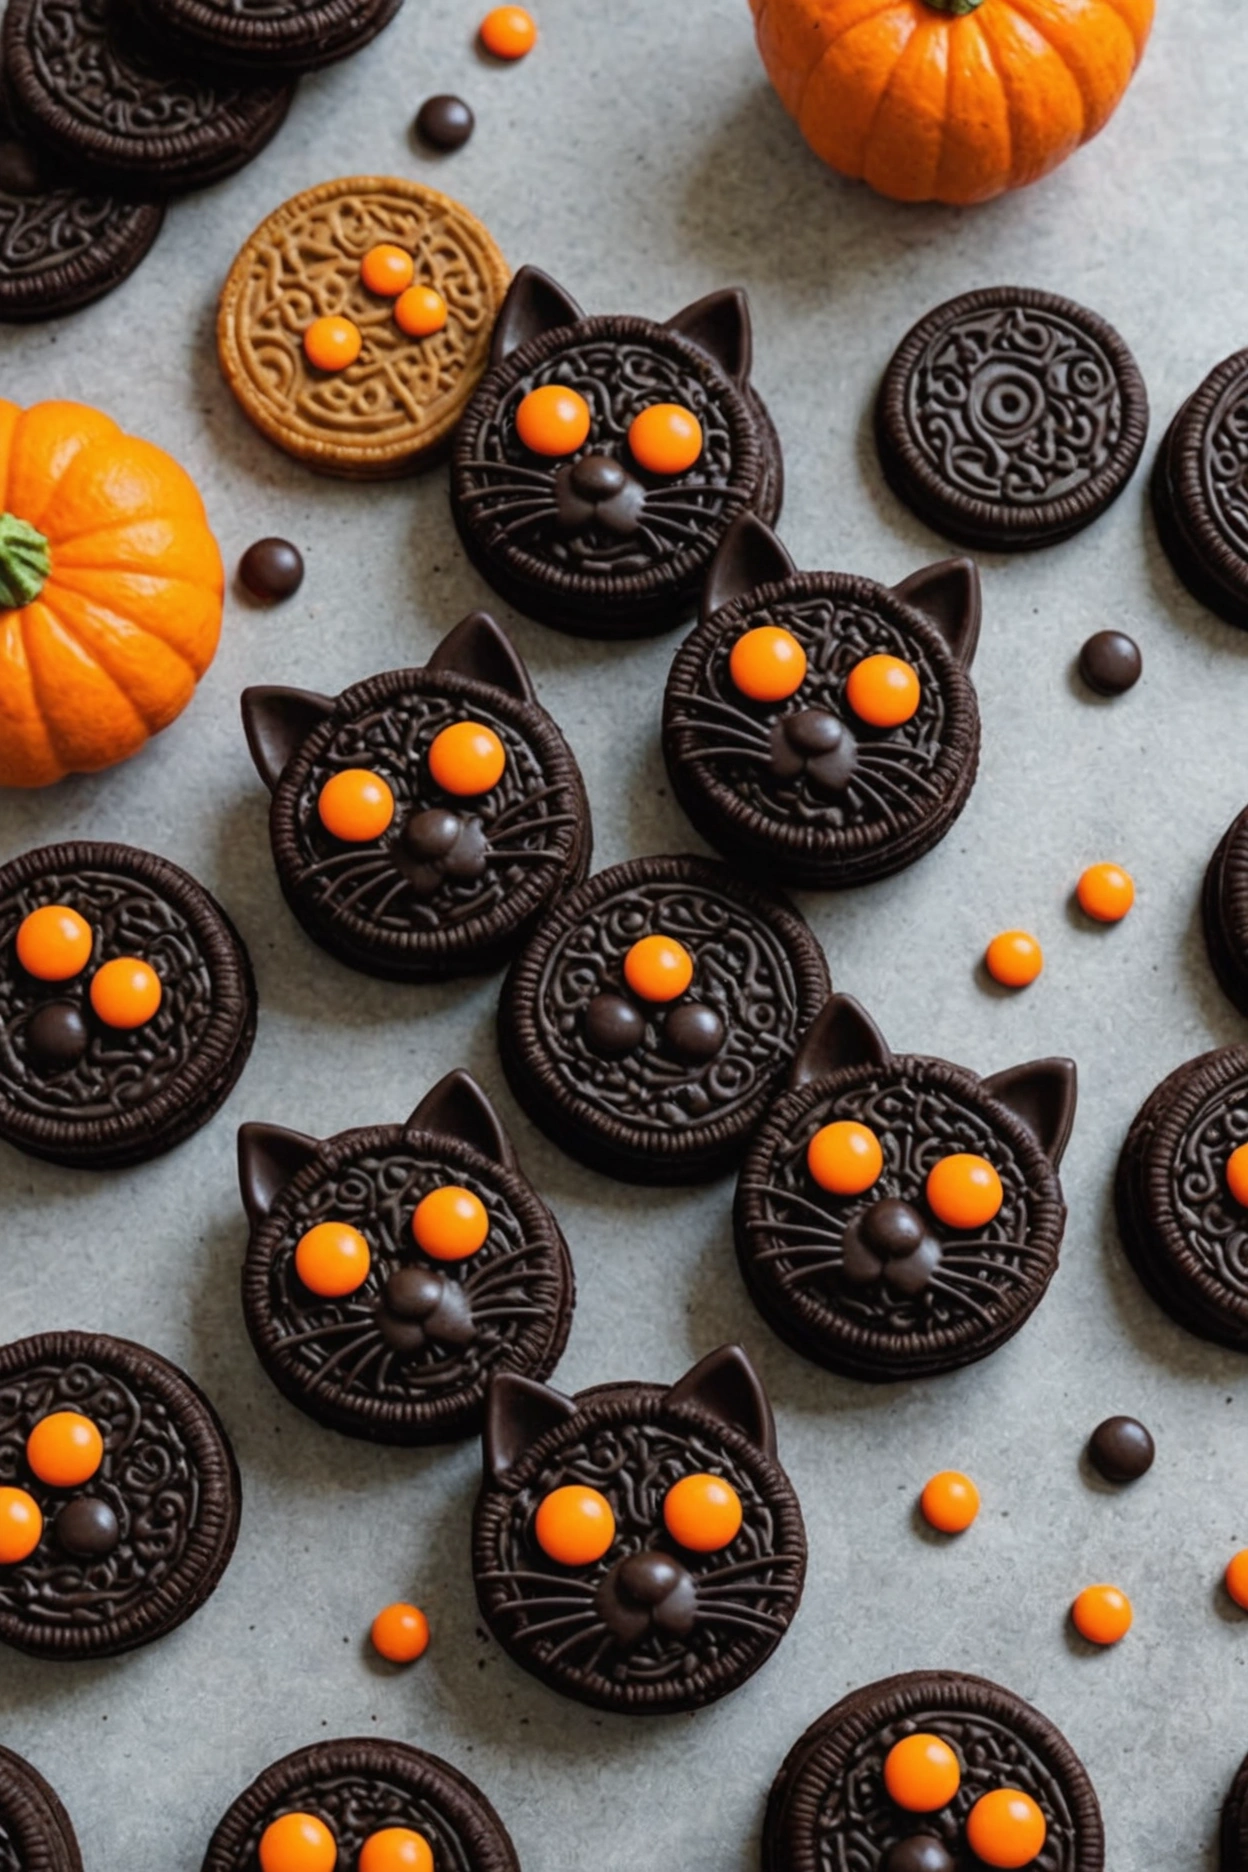
I am a big fan of Halloween-themed sweets, and at the very top of my list we have Black Cat Oreos . Full of cocoa, and a sprinkle of vanilla, and just a touch of something a little more mysterious, they are just too good to be true — a treat created with magic.
The dark chocolate and the white filling are my kind of magic double-trouble. Just like with magic tricks, these mysteries feel like a supernatural “trick” or “treat” all year long.
Ingredients
- 15 Oreo cookies
- 1/2 cup semisweet chocolate chips
- 30 candy eyes
- 15 candy-coated chocolate buttons (brown recommended)
- 30 small triangle-shaped candies (e.g., orange-colored or chocolate for ears)
- Black decorating gel
Instructions
1. Melt the semisweet chip morsels in a microwave-safe bowl on high for 30 seconds and then stir until smooth.
2. Carefully separate the Oreo cookies, keeping the cream side intact.
3. Dip the backsides of two of the candy eyes in the melted chocolate, and stick them on the backside of each Oreo for your kitty’s eyes.
4. Dip the point of a small melting chocolate blob into the back of a candy-coated chocolate button and stick it where the eyes are to form the nose. 5) With the black decorating gel, draw whiskers either side of the nose.
6. Mound small triangular lumps of the cream from the tops of each Oreo to make the cat’s ears. Pop the halves of the Oreos back together, and voila! It’s a Kitty.
16. Candy Corn Fudge
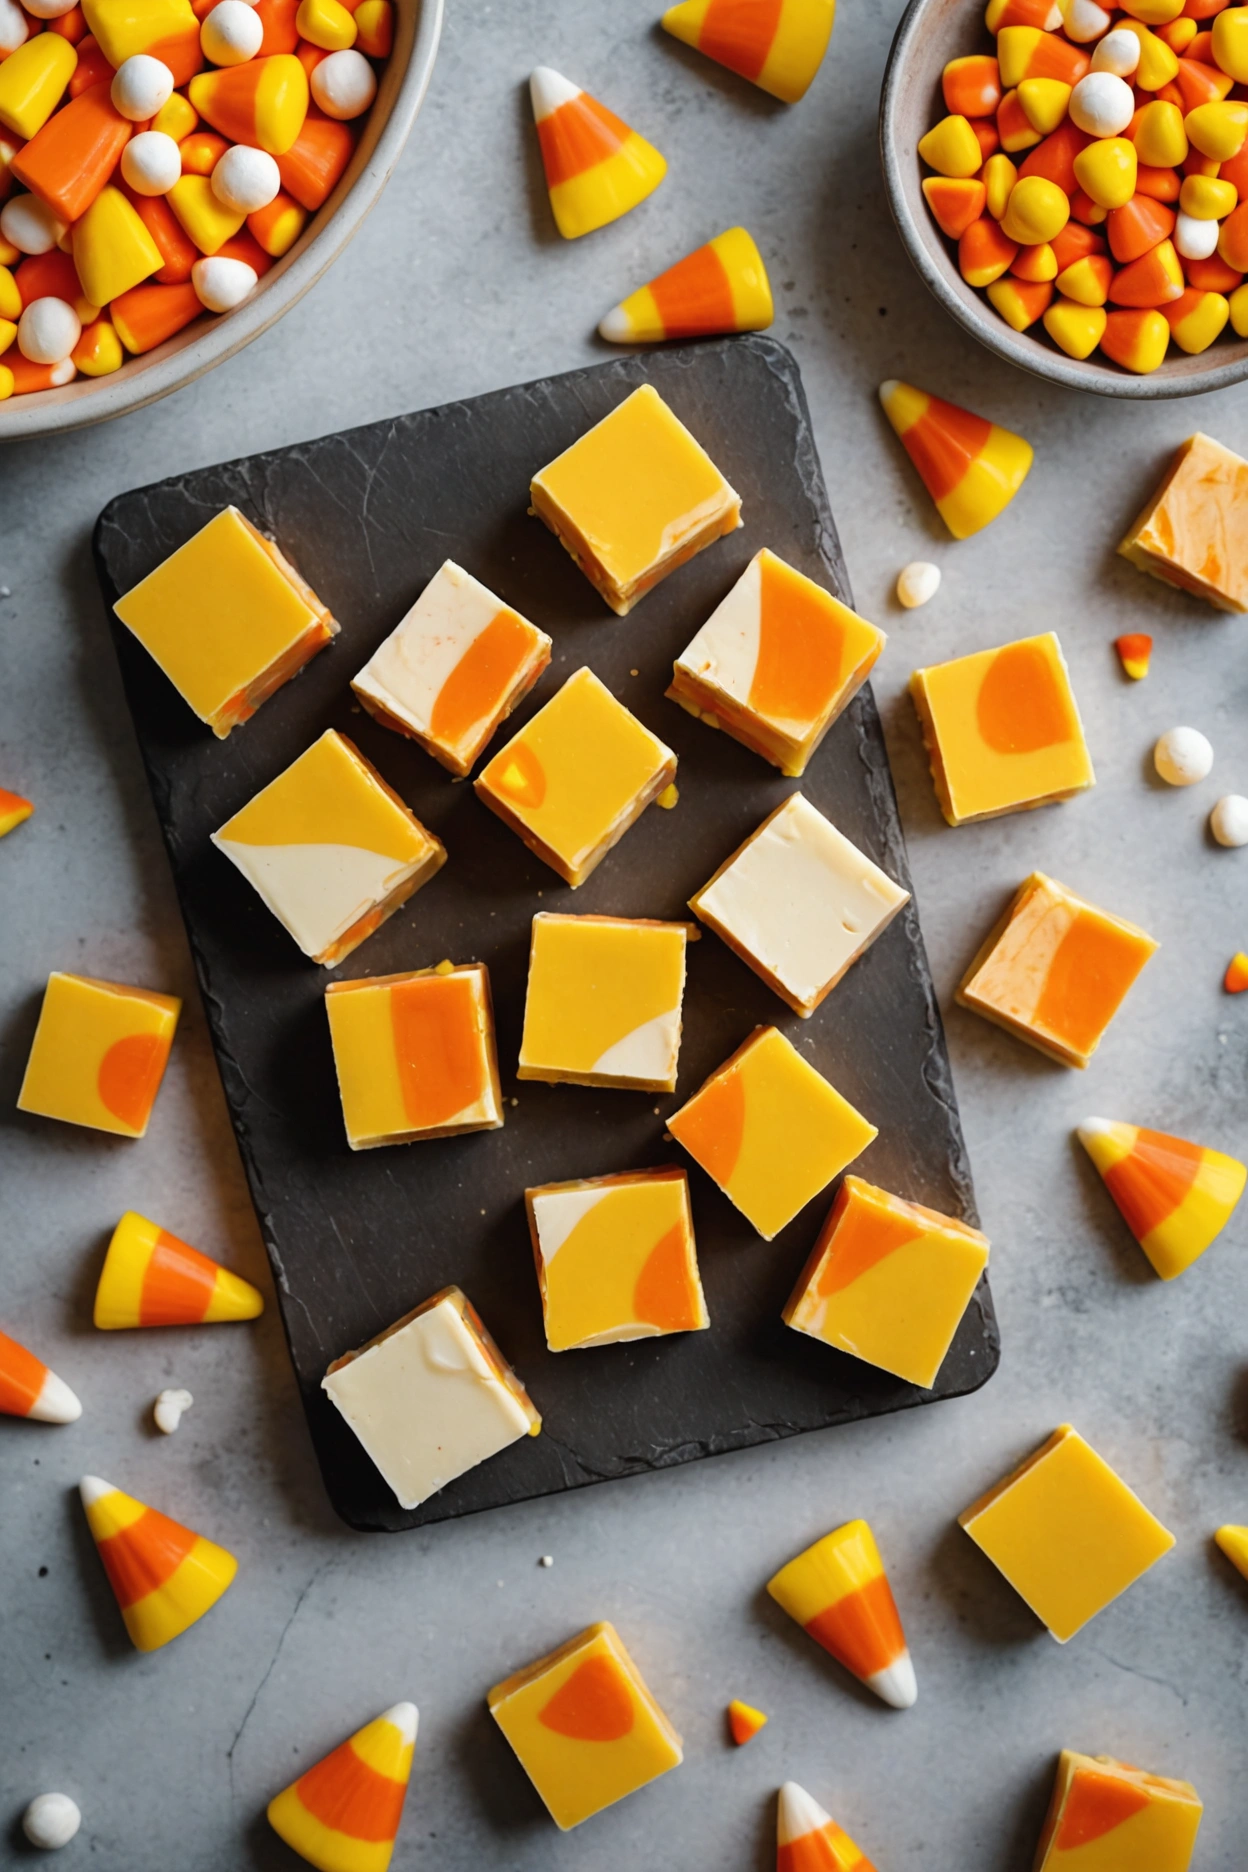
I love to make sweet treats, and one of my go-to fall recipes is white chocolate mixed with sweetened condensed milk and candy corn, but you might like it even more with a little vanilla extract. In my kitchen this is our fall treat tradition and a way to bring some fun to a party.
Ingredients
- 3 cups white chocolate chips
- 1 (14-ounce) can sweetened condensed milk
- 1 teaspoon vanilla extract
- Food coloring (yellow and orange)
- 1 cup candy corn
Instructions
1. Line an 8×8-inch baking pan with foil and coat with cooking spray.
2. Melt the white chocolate chips and sweetened condensed milk in a medium saucepan over low heat, stirring constantly, until smooth.
3. Remove from heat and stir in vanilla extract.
4. Split into three bowls. Leave the first bowl white, and add yellow food colouring to the second, and orange to the third.
5. Pour yellow fudge mixture into prepared pan and spread evenly. Let cool slightly, then top with orange mixture, and white mixture.
6. Press the candy corn into the top layer, then refrigerate for an hour or two or until set. Remove from the pan, cut into squares and serve.

